Tuesday, February 12, 2019

Making tracks

"There’s a track winding back
To an old-fashioned shack
Along the road to Gundagai –


Do you recognise this line, from the classic Australian folk song, Along the road to Gundagai? It was made popular during, World War II, when battered Australian soldiers, dreamed of returning home. The lyrics call, to make your way back home again - to family, friends the landscape, and ultimately, the things of your youth.

I guess that's the power of a road, and how to find yourself on one! Which is a rather long introduction, for my first land management post, for 2019. We're making tracks. Literally. Into the bush. For a significant purpose. I will return to that classic Australian folk song, at the end.


 One of these paths, is not like the other


Above, is a Roo Track, made by kangaroos. They're forged over the years, by a multitude of hopping marsupials. It's pretty impressive. However, those tracks are generally narrow, and follow a ridge-line. Consequently, they tend to be steep. Which is great, if you're as agile, as a healthy kangaroo!

Looking into the future though, if we want to use small machines to get about on our property (because of age, or we just need to get equipment up there) it makes sense, to develop better tracks. How do we do that? By working with the contour of the land....


 Going up slope
 

The contour, is essentially the shape of the slope. We wanted to cut a road, around the contour of the slope, rather than straight up it, like a ridge. This creates a gentler gradient for people, animals and machinery to traverse.

We started by raking away the mulch (compliments of nature - thank you!) and used a mattock, to cut into the slope. Then the fill from that cut, got dumped further away from the slope - making a wider track. Old logs and branches were placed at the base, to stop the fill, slowly migrating down hill.

Covered with the mulch again, it looks like it's always been there.


Top of the path


We're still working on the top of the slope, as indicated by the dirt. We'll mulch over it, once satisfied, enough fill has leveled the top. We're not going for plumb level, accurate. Slopes are the nature of the terrain, and we'd be working forever, trying to flatten everything. So the goal, is only to flatten the ruts and any dangerous tipping points, up the top.

Nature helps in this regard as well, by providing the trees we cut down, to stop the fill, migrating down hill. This is how we managed to flatten(ish) the top of the slope, a little more. A large tree trunk was used, to raise the level of the footpath. Not much higher, but enough to make a difference.


Fill, butts against the log


As you can see, we're still working around a lot of living trees too. And I mean, A LOT! Which is how we get so much, free mulch and landscaping logs, in the first place. It's nice, that we don't have to hitch-up the trailer and make a trip into town for these things. Nor, hand over our hard-earned money. We just wander into the bush, with some hand tools, and find what we need.

We're enjoying one of the many pay-offs, for not removing the indigenous plants, willy-nilly. Although it IS harder work, when you want to remove them. But it's far better to work from abundance, than scarcity. Especially in a drought.


   The drop-off


At the very top of our new path, it merges with another, preexisting, Roo track. It goes down into a steep dip, because it's near the end of one of our gullies. Or a natural path of erosion, where the water runs off, in a storm. That water, continues to cut between two slopes - creating a wider and deeper gully.

We're planning on harnessing those windfalls of water, and stopping the erosion. By improving the old Roo track, in the process. We're going to fill in that dip, with more dirt.


Dam wall, joins with new track


We're getting that dirt, by cutting a new pond, back into the gully - up slope. We create the dam wall, by dumping the dirt, lower down hill. I had some good clay in the beginning, but the further I cut into the gully, the more sandy sediment I'm finding. Which is not suitable, for building dam walls.

However, it's perfect for footpaths where quick drainage, is desired. So we hauled that sandy sediment, to the top of our footpath. Now we've improved the gradient up hill, I can migrate clay to the dam wall, from the front of the property, instead. My barrow will have a much easier time of it.

It's a lot of hard work, but also significant work too. I actually started this project, last year. The heat of summer, mostly put an end to it. However, there were a couple of reminders lately, to get cracking again.


Attempting to cool down


Remember this female Joey, that was enjoying the cool dirt, recently? She actually found that patch of dirt, from the footpath I tinkered with. Her presence reminded me, what we do in the landscape, has an impact.

It was the presence of the Roo tracks, which showed us, where to start improving them in the first place. Not on any part of the slope, but where the kangaroos had specifically chosen. We're essentially, following the tracks the kangaroos have laid out. Then, improving them.

But now for some sad news...


Some don't make it


Fret not. This isn't our female Joey, but a male kangaroo. Only about 3 years old, we estimated. In another year, he would have entered his prime - but unfortunately, we think he had a collision with a car. Somehow, he made his way back home. He would have been raised here, by his mother. Which is why we think he returned.

We first saw his injuries, late January, when he was drinking from the birdbath. He couldn't hop, because of an injury to his heel, but he could walk on one foot, with the help of his tail. I don't know how far he walked, but I know I saw him enter our property, from the back - where there are no roads. So he had a long way to travel.

Several days later, in early February - I found him laid out, in the lowest and widest gully on the property. Which normally floods. But not this year. Not for over a year. So we buried him, right next to where he laid. I couldn't help but wonder, afterwards - why here? Why did you walk all that way, to come home - when you could barely even walk?


Life continues


I guess the answer to that question, starts right here - with the next generation of male Joey. I wrote about this little fellow, suddenly appearing, while Growing at Gully Grove. He's about the same age as that female Joey, above. So he's bigger now. I saw them both in the yard, yesterday afternoon, grazing from the grass, watered by our septic.

These Joey's are brought here, by their mothers, because we landscape with them in mind. We keep the plants, improve the tracks and hold back the water. In the wet. As well as in the dry. Which is precisely why, that injured male came home to rest, I guess.

"Then no more will I roam,
When I’m heading right for home
Along the road to Gundagai."


All tracks, lead home


I know it's a little sad, but just like we followed the kangaroo trails, I couldn't help but thank this male, almost at his prime - for reminding me to continue improving those tracks again. For people and animals to use, who may not be in their prime any more.

There's a rhyme and reason, for everything we do here. Always more connections, than what's on the mere surface. Consider a dirt track. After all, it only comes into being, because everything was laid down before it. The water cuts the gully. The kangaroos, mark the trails. The people (at least these two) attempt to build a track, across it.

Are you planning for your not-so-prime years yet? Any great ideas to share? As you can see by this post, we're planning for better accessibility around the property. For us, and the wildlife, we share our story with.


Saturday, February 9, 2019

Bag workshop

Today's plans almost didn't transpire, due to Peter getting sick. A good night's sleep, had him well enough for me to go again, in the morning. Go where? The Toowoomba Simple Living, bag workshop!

It was my first visit as a spectator, rather than a presenter, for the sourdough workshops I've done formerly. The tutors were wonderfully informative, and I learned so many tricks to making your own bags.


Recycled doilies and denim


I loved the recycling ethos, and how to personalise your own bags. The two presenters (Neralie and Valda) used different applique techniques, reverse applique which was especially new to me, blanket stitch (machine and hand embroidered) incorporating buttons, peepers, handles, curves on the bias, and so much more!

I especially appreciated the demonstration, how to make bags, similar to the ones purchased from the supermarkets. Only made from recycled denim jeans, these bags have so much more heft to them. Yet the shape and construction, conforms to the checkout cradle, which holds them, while being filled.


Loved the Japanese theme


I even discovered my quilting foot, was perfect for sewing the bag together. As the different layers of fabric can be quite hefty, while sewing. The sturdy design of the quilting foot, is better suited, than a regular foot. Although, you can still use a regular sewing foot. I'm just thrilled to find another reason to use my quilting foot!

Now I just need to purchase some jean needles for my sewing machine. I have plenty of scrap fabric, and even some jeans. This particular workshop, gave me the confidence to tackle some new sewing projects, I've wanted to try. I mean, what can be more practical, than a bag?

If you're reading this Nanna Chel, Margy, Margaret, Barb, Sandy and Maria (I hope I got that right) it was nice to catch up with you all again.


And here are some useful links for making different bags
{from really talented people}:

Folded corner, box tutorial
As above - only with French seams
Hold-it Bin tutorial
Fabric basket tutorial


Wednesday, February 6, 2019

Good investments

I'm not talking about stock or real-estate investments. Rather, what do you consider a good equipment investment, to spend money on at home. My rule of thumb is: it has to serve more than one purpose, reduces waste and has to be able to last a long time. Especially if it's not cheap!

One such investment, happened early last year. It was purchased with a gift card, received for Christmas. This particular item, has been on my radar for several years.


3 in 1


It was a Fiskars brand, gift tag maker. At $40, I considered it expensive for the purpose of making gift-tags! However, in the one tool, it had three different processes. The first slot at the bottom, was for cutting gift tags. The second slot (at the front) was for punching a hole in the gift tag - and finally, the spindle underneath the handle, attached, metal hole protectors.


Finished gift tag


Why a hole protector? It ensures you don't cut through the hole, when attaching the string. I've done that before! The metal eyelets, came with the cutter, but will have to purchase more, when they're gone.

The main reason for purchasing this cutter, was for recycling Christmas cards we receive. But also, any card we come across that would look good as a tag. Do you want to know where the above card, came from?


Card stock 
waste not, want not


A packet of chocolate! Mmmm...chocolate. We like the plain stuff, with high cocoa - so not the milk chocolate, or flavoured centres. We don't normally buy this particular brand, but our regular chocolate wasn't on special. So improvised!

As the packet was transported to our recycle bin, that gold embellishment caught my eye. It would look perfect, as a gift-tag. So before any card goes into the recycle bin now, I see what parts can be scavenged for a gift tag. So long as it's clean card, that is!

What do you consider a good equipment investment, in your home - and what is your rule of thumb, for making them?


Monday, February 4, 2019

Vertical space

We have a modest sized, four bedroom house, so you'd think, space isn't a problem. Without a proper garage/workshop outside though, most of my power tools and DIY supplies, live inside the house. Which makes for quite the squeeze, in our two main linen cupboards.

Naturally, I've had to find inventive ways, to maximise storage space anywhere else I can in the house. Enter, vertical space! I've touched on this subject, previously, when I wrote about Weekend Projects Inside. I wanted to share how some of those storage solutions, worked, as well as some of the extensions I've made, recently too.


 July, 2015 
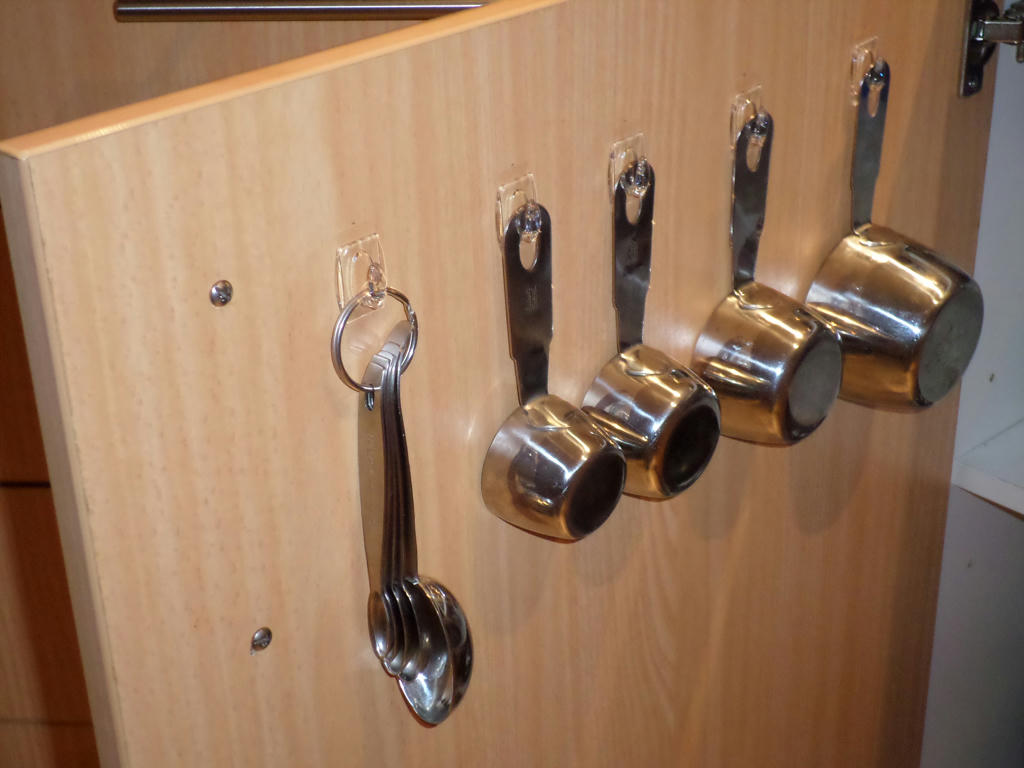
baking cabinet ~ still in use


Inside the kitchen cabinets, I shared how the wonders of adhesive hooks, worked at arranging some of my cooking tools. I'm happy to report, in almost four years of opening and closing that door - none of the "Command" brand adhesive hooks, have come undone.

It's saved so much time, having the measurement tools I use often (for baking, fermentation, and all kinds of meal preparations) right there. Instead of rummaging through items I don't use as much. So when deciding what items you will hang, favour what you will use the most.


January, 2019
baking cabinet - new addition


I made a little extension to this particular door, recently. The item I chose to hang, does break the rule about being the most frequently used item. As it's not. But there are good reasons for it making the cut, as well.

As my attempts at preserving, have increased over the years, the wide-mouth jars I prefer to use, are hard to break the seal, by hand. Enter, the jar opener! It's very simple, and replaces the old spoon trick I used formerly.

While, I don't need to use a jar opener as regularly as my measurement tools, I hung it for safety reasons. Because it shared drawer space with other sharp utensils, like an arrangement of different chef knives and hand graters. So hang mismatched items, if it removes them from a more hazardous location.


 January 2019
Utility/linen cupboard ~ still in use


Speaking of hazards, do you remember that utility cupboard door, I hung our brooms and dustpans from? I no longer had the danger of broom handles, falling on my head, while attempting to get the vacuum cleaner out of the cupboard. As the sweeping implements, were formerly stored on the floor, with the vacuum cleaner. 

While it can still, sometimes be a struggle to get the vacuum cleaner out (always the way, with bulky items) the adhesive hooks have not wavered. So still no endangerment of falling brooms on my head!


 January 2019
Utility/linen cupboard ~ new addition


I made a recent addition, to the adjoining door. It's a safe place to hang our fire blanket. Formerly, it was sitting under the kitchen sink. While it was close to the stove in that position, the blanket was made to be fixed to a wall, and accessed quickly from the base. So the linen cupboard was a better choice, even if it was a few more metres away. 


July 2015
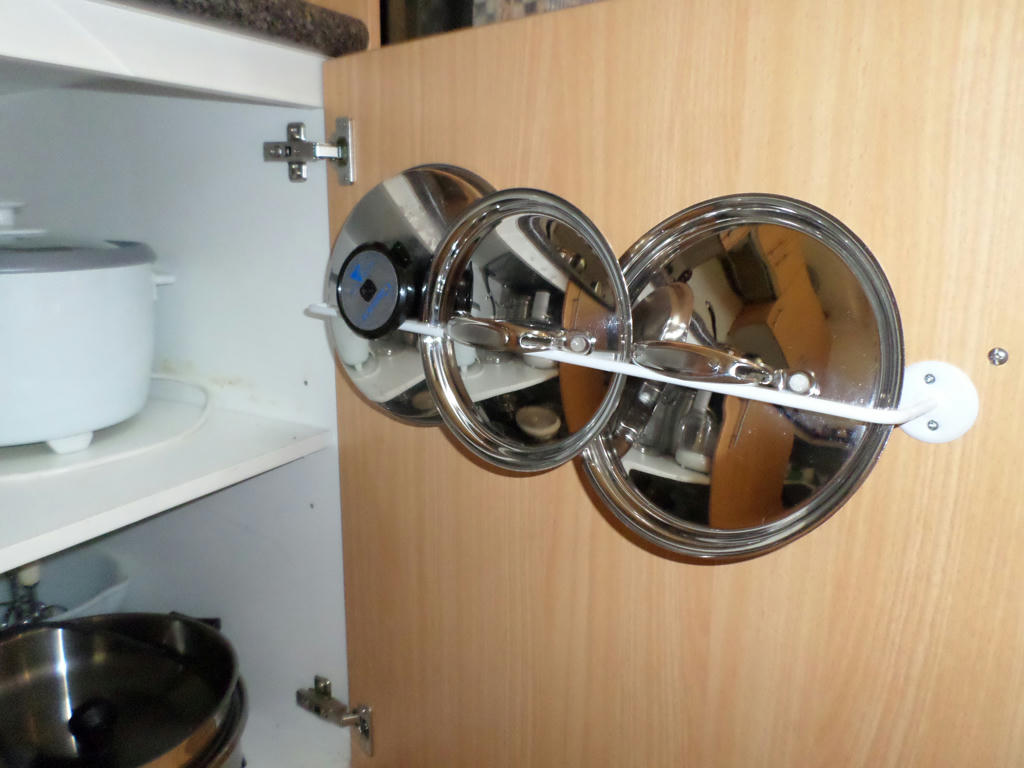
Stove, cabinet ~ still in use


The saucepan lid holder, has performed well over the four year period, too. Although I'm surprised, how little, I actually use them in comparison to the saucepans. But it did the job of clearing out drawer space, to access frying pans, better.

One thing worth noting, is how you will lose the equivalent storage space, inside your cabinet. If there is lots of bulky equipment inside, like mine, you may not have the cabinet space to sacrifice. I'm glad I only used this small portion of the cabinet door, and have the majority of the cavity, free for bulky equipment.

I'm still happy I divided the saucepan lids, from the frying pans. But I'm equally glad, I didn't go crazy hanging stuff inside THIS particular cabinet. So consider the internal cabinet space, you will be sacrificing, by hanging things from the door. There will be certain cabinets, this is just not a good fit for. Literally.


July 2015
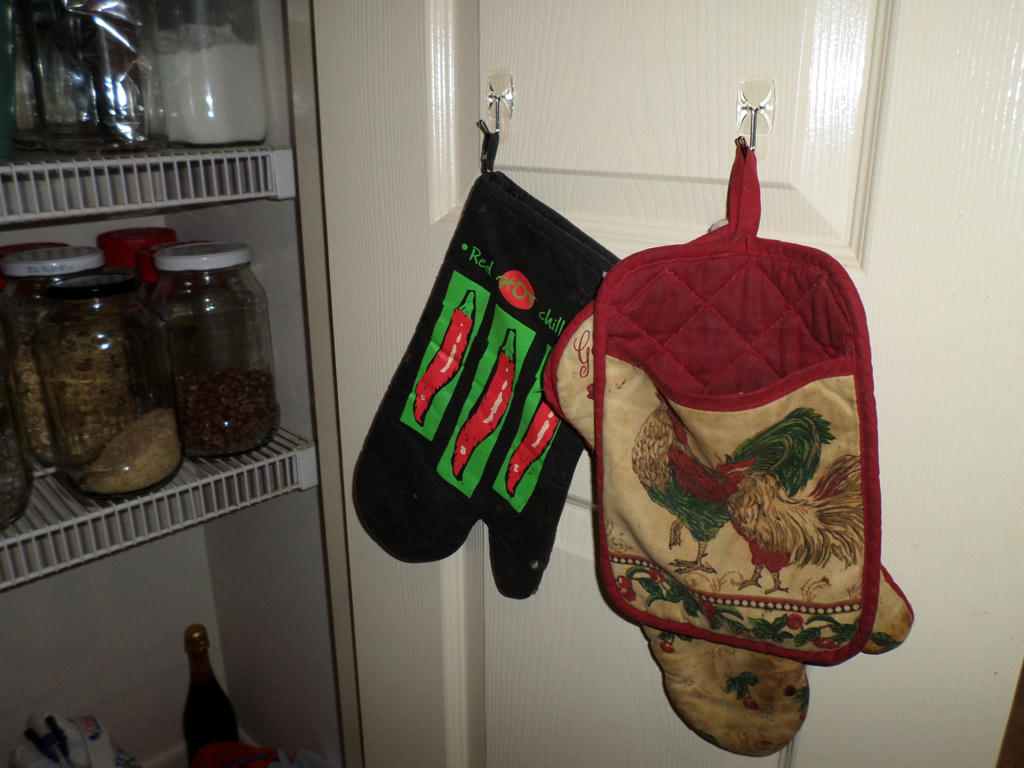
Kitchen pantry ~ still in use


How have my oven-mitts, hung inside the pantry door, performed over the years? The hooks have not faltered, even with the fluctuating temperatures that can happen between summer and winter. Heat, is generally the undoing of most adhesive hooks. Of all the "Command" brand hooks I've used, they've not lost their adhesion, all this time.

Do I regret having my oven-mitts, a little further away from the oven though? Not really. I tend to get them out, and leave them near the stove, when something is baking anyway. Otherwise, they can happily live inside the pantry, and I can have my bench space, back.


July 2015
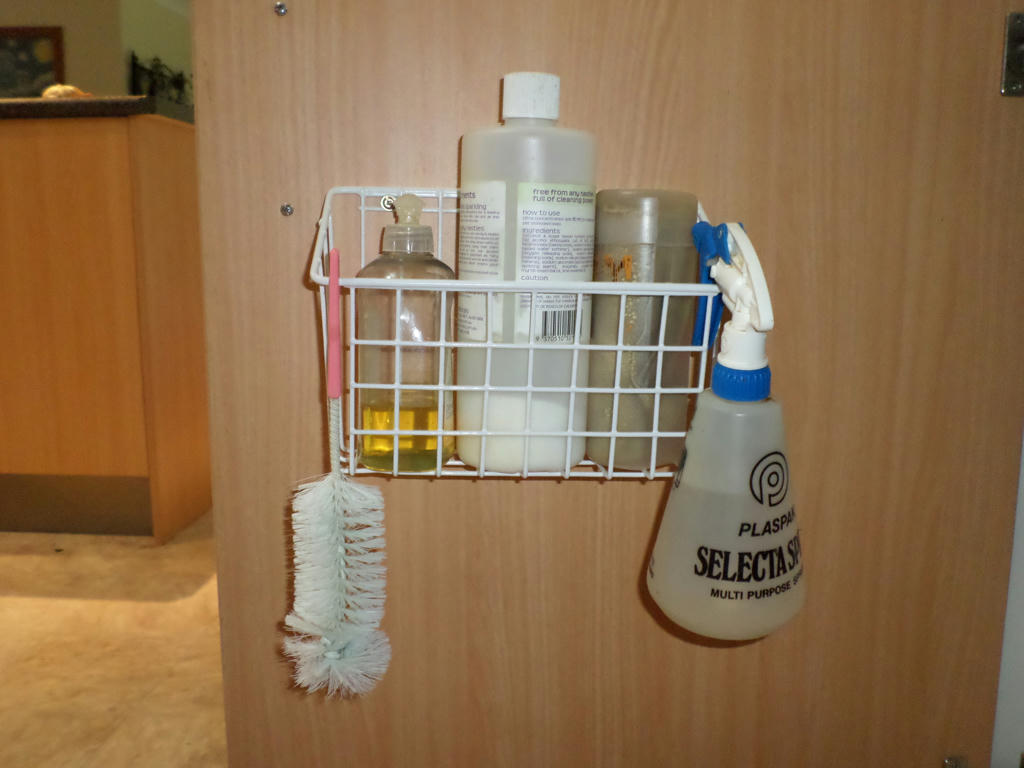
Sink, cabinet ~ still in use


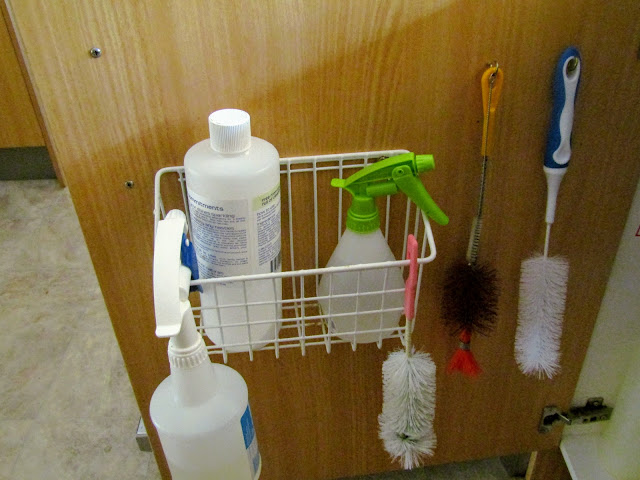
Finally, to the last, and what I consider the most successful vertical space, installed in the kitchen. It's a a wire basket, under the washing-up sink. It's purpose is to hold cleaning items, I use the most.

It has saved my back, bending down to the lower shelf, for items only required a few minutes. While only such a short duration, things like the "Miracle Spray", for example, were retrieved multiple times a day! So consider using vertical space, where it can help save your back, with repetitious tasks.


January 2019
Sink, cabinet ~ new addition


It's success, warranted expansion. Bottle brushes! If you make kombucha at home, or use glass bottles to store water in the fridge - even using narrow reusable straws, then you'll be familiar with the necessity of a brush collection.

Not having to bend down at the back of the kitchen sink, any more, meant I was suddenly washing the bottles, as soon as they migrated to the counter. It's one of those things I SHOULD have made more easily accessible. Because in hindsight, I realise this is why my kitchen counter, often looked like a bottle recycling centre - and not in a good way!

It's also why, I would try and stick my hand into narrow jars - attempting to get the dishcloth, to the bottom. Now it's become a habit to grab the bottle brushes from the door, whenever I need them at the sink. There are so many more things I wash with the brushes now, because they're so easily accessible.


January 2019
Sink cabinet door


I'm not finished with this particular door, just yet. On the opposite side, is a convenient place for my knitted dishcloths, to dry. Originally purchased at a cheapy-store (Dollar-store, for the US) it's one of the easiest ways to create vertical space. Just by hanging it over the door. Removable. Portable. No adhesive strips. Nor drills.

It may sound silly, but having a dedicated place to hang your dishcloth, is a big deal. Formerly, I'd use the tap spout, or dish drying-rack. Which wasn't always convenient, with a really stacked load of dishes. Sometimes migrating it to the tap, wasn't a good idea either. Especially if you're in the middle of cooking dinner, and need to rinse something in the sink. It threatened to fall in the food, every time!

Now I don't worry about homeless, wet cloths, getting in the way.


January 2019
Sink, cabinet ~ new addition


Cleaning under the sink recently, I decided to move more items out, and onto the adjoining door. The fly squat (mandatory in summer) and BBQ lighter, take such little space, but often their requirement, is a case of urgency.

The BBQ lighter comes in handy, after a power outage. Finding the means to light candles in the dark, is challenging. Likewise, who wants to break eye-contact with an annoying fly, to retrieve the squatter? Both can be very frustrating situations. Now dealt with, by quick retrieval. I've kept this area, intentionally sparse. Like the fire blanket above. All to facilitate the need for an urgent, automatic, response.

This was actually the cabinet door, I considered hanging the fire blanket from.


January 2019
Sink cabinet ~ underutilised, space


Of all the cabinets in the kitchen - it's under the sink which was, most forgiving to vertical storage on doors. There's plenty of wasted space, under a sink. Just ensure, anything you plan to attach to the doors, has enough clearance around the plumbing, first. Otherwise, you may find the doors won't close afterwards.

Unlike an appliances cabinet, or saucepan cupboard; where bulky stockpots have nowhere else to go - don't plan to utilise those cabinet doors, for vertical space. Multiple, bulky items, need all the space you can give them! So keep that in mind, when contemplating which cabinet doors, to use vertical space on. Some cabinet doors, will seem endless, others, are best leaving to maximise cabinet space.

Even though we don't live in a tiny house, we're nonetheless stacking functions with the storage available. So space, is still a premium consideration. What I like about the improvements thus far, is how it all cost under $50. Plus, I still have spare hooks to use when I find a purpose. And there's always a purpose!

I look forward to sharing more vertical space solutions, in future.


Saturday, February 2, 2019

Ominous spanners

The ominous spanner in the works, will be visiting my blog soon. Not from my own doing, but apparently Google+ is shutting down, for good. Therefore, all comments made on my blog, signed in with a Google+ account (including my own) will be deleted from April 2.

It will also mean, all the comments I made on other blogs with my Google+ account, will be deleted too. Sorry about that, but it's certainly out of all of our hands.


Get to work


I'm attempting to download a copy of my Google+ data. How to reinstate comments, back on my blog however, is still being researched. I don't even know if it's possible. But I'm also going to save a back-up of my blog, as a precaution too. I recommend if you use a Google+ account, with your blog or comments, you take measures to save your data before it gets deleted on April 2.

I don't know what this shutdown, will mean for my blog - or how it will look in the end. But I'm just giving you all a heads-up, that things may look very different after March.

The good news is, Blogger isn't going anywhere. So my Gully Grove address won't be disappearing into the ether, along with Google+. At least, not for now, lol.