Wow. Life! Right? I just want to press publish now, because explaining everything that has happened lately, wouldn't sum it up as well as those three words do. Perhaps I'm also feeling less is, or should be, more.
Think. Words. Energy. Gone. Or something like that. Actually, I think I will explain it like that...
Tax. Dishwasher broken. Move chicks. Grass. Gone. Prickles everywhere. Dig. Text plumber. Two weeks pass. Call plumber. Dig some more. Remove trees. Chainsaw blunt. Axe handle not secure. Make do. Build new chicken accommodation. No time. Scrounge something. Revive sourdough. Plan to give sourdough workshop. Make calls. Email. Water tank arriving soon. Not finished digging. Do we need to hire equipment? Make calls. Rain coming. Cover chicks. Problem with tow-ball. Need to collect crusher dust. Deadline looming.
Forgetting.
Where.
Head.
Is.
I'm guessing at this point, I may not get back to regular blogging until late November. We're fine, just extremely busy.

Sunday, October 30, 2016
Thursday, October 13, 2016
Production in new beds

Newly installed hugelkultur beds
So the last time, we left our new hugelkultur beds, was on the last day of July. They've been planted out and chugging along nicely for roughly, two and a half months now.
We did receive quite a bit of unseasonal, spring rains, so I cannot say for certain how these beds perform in our usual climate - but I can say, they've kept and maintained the rainfall, for far longer than our ground level garden beds did. I have only started to water them recently.
Last growing season, I was running a can of water (each) to 4 separate beds, and that was about the same time of year. It was every day, for as long as we were without rainfall. Which says a lot about the lack of rain, then, but these new beds (when they do receive the rainfall) hold onto it like a sponge. I didn't get that kind of absorbency with the old beds. They needed to be watered every day, like clockwork.

Taken yesterday
So here we are, in the hugelkultur production beds, more recently. While the beds themselves are brimming with vegetables, notice the area around the avocado tree too. I've never had nasturtiums grow like weeds here before. I will share my thoughts on why that area is so productive. There are points to note, about what the hugelkultur beds are doing for those plants growing on the edges of them both. But I'll save that for another post.
In the meantime, let's take a look at what's growing in the beds...

Second bed
We'll start with bed two, which was the last to be planted out. It actually suffered the most damage from brush turkeys, so we changed the large wire mesh we had over the top (for protection) to casurina leafs and branches. When layered well on the bed, it's hard for turkeys to scratch up.
I have kale, beetroot and spaghetti squash (my favourite) in this bed, along with some perennial herbs.

Squash fruit, forming
This second bed, is doing okay for suffering several turkey invasions, but it's also facing west. Therefore, cops the last of the heat of the day. I suspect it's the extra heat exposure, making this bed a little drier than the other.
Plants like the squash and kale, have large tap roots however, so don't seem phased. Compared to last year's crop of spaghetti squash, this new crop is doing so much better.

First bed
The first bed we made however, is the most productive. Because it's been in the longest. Plus I didn't have to replace plants or soil, from turkey scratching. Remember that we've had more spring rain than usual, which is why it's looking so lush. But the absorbent nature of the hugelkultur bed means, I haven't had to run water to it, until recently.
So that's two and a half months, since I've had to start watering. This is after watering the materials in the original set-up. I don't think I mentioned that, when describing how we put it together. I watered with every new layer I placed in the bed. But all that water, and the rainfall, went a very long way.
I've not experienced anything like it before - to have a bed which retains moisture, longer than a week without rain or artificial watering.

Beetroot
My beets are almost ready to harvest. I grew some last year in the old beds, but most of them didn't make it. The few which did, were very pint sized. Still delicious, but I think the ones this year, are going to be better.
I love to make beetroot smoothies and beetroot cake. They're both very delicious, and even my vegetable fearing daughter will eat them, when prepared this way. So beets are definitely in our top veggies to grow.

Lots of greens
Still in the same bed, I have more kale, parsley, dill and a lone sunflower. The herbs get used regularly. The dill is especially delicious in creamy salad dressing, which get lavished on potato or egg salad. The green kale gets eaten as green smoothies, and kale chips. More food we love to eat.
It's been very nice to have a reliable supply of food we can bring into the kitchen. While we're still buying a lot of fruit and veg, it's also nice to see our home grown produce increasing, and the quality improving. I think it's fair to say, the new hugelkultur beds have something to do with that difference.

Choko vine
Still in the same bed, I have my beloved choko vine, which I have dearly missed for several seasons. It should absolutely love this hugelkultur bed, because it's such a survivor with a deep, fleshy tap root. I'm really hoping to grow my own chokos this year, as I love to make my annual supply of choko chutney.
It's a shame to have to buy them, when they're usually so easy to grow.

Guilds
My calendula (pot marigold) is flowering nicely, along with some arrowroot. I like to mix things up with different levels, so different micro-climates can exist in the same bed. The tall arrowroot, with its fleshy rhizomes, can weather the heat better than the calendula, and help to shade the soil.
You can also see a bean, which has found it's way up the choko trellis...

Meandering vines
I tried to grow the purple king bean (far left) over the edge of the bed. In the hopes it would help to shade the retaining wall. But all the plants just entwine together, in an attempt to get higher. I have to keep reminding them to stop climbing the other plants in the bed. But only the ones, they threaten to suffocate.
I actually prefer having beans, sprawl where they want to, as opposed to straight up a trellis. This also helps to create micro-climate between the soil level and the plants. So I'm not completely opposed to it's wandering tendrils.
You can also see in the same picture above, some sweet potato leafs (the lowest hanging vine. And some nasturtiums, which are not planted in this bed, but creeping over from the avocado tree. I also have some yacon growing in this bed, which I hope will actually produce something edible this year. So there's quite a lot of production from one 1.8m x 1m bed.

Bean tendrils, entwining, to get higher
I think it's the height (roughly 60cms) filled with slowly decaying material, that helps increase the production levels. I concede the extra moisture has helped them along, but the fact this bed holds onto moisture and provides a regular source of feed for plants, is what I have been missing from my normal ground beds. Not to mention, I don't have to deal with the clay in our soils.
These raised hugelkultur beds, have actually done better than my wicking boxes. I suspect the fact they're black tubs, against a brick retaining wall has helped to cook their roots however. So I need to work on my placement of the wicking boxes, better. Once we actually get that overhead trellis up, to cast shade, the boxes will probably fair a lot better.
But October and November is all about installing rainwater tanks, so that trellis will just have to wait. The next post I hope to write, will be about the avocado tree between the beds.
Wednesday, October 12, 2016
Hugelkultur bed - part 2
I won't have to go into as much detail as I did for the first Hugelkultur bed, but I wanted to demonstrate a few new materials I introduced, which weren't in the first. I pretty much did everything the same, only we had to purchase some green shade cloth, as we didn't have any more leftovers. I also started the base layer, with old wood.

These logs also came from down in the gully, and were well and truly decayed. It didn't take much, to break pieces off, and find the soft, spongy material, left over from termite infestation.
This is the preferred wood for hugelkulture - logs which have spent some time in the elements, breaking down. Because it's pure feed for the plants which go into the bed, rather than drawing nutrients from the soil, in order to break down. It shouldn't matter if you use fresh logs, but it may take a year longer for the plants to benefit as much.

Instead of pumpkin vines, we added some passionfruit vines, to this bed, as we were removing it, at this point. Same soil and coffee grounds went into the base layers, but instead of large branches I used thick tree bark. It had been stripped from some saplings we took out and needed a use for.
I've read that eucalyptus isn't the best material to use for hugelkulture (which this bark is sourced from) as it takes ages to break down and can leave oils not favourable for plants. As long as it's had some time out in the elements (6 months to a year) and mixed with other materials though, it doesn't present much of a problem.

Instead of Mother of millions succulent, we used prickly pear in the second bed. Again, using the reasoning of trapping moisture in the base layer, for plant roots to migrated down to. This was another resource our land grew, which can be considered a nuisance. But in removing it, and using it, the prickly pear becomes a valuable resource instead.

I still had plenty of twigs and smaller branches to use, from our endless resource of fallen trees. Acacias have a short lifespan around these parts, and so we have plenty of woody material to draw from.
Acacias are better wood to use in hugelkultur than eucalyptus, as they contain less oils and break down a lot quicker. But it's about using what your land produces, and just adding a range of materials from all that you have.
We filled the rest of this bed, with purchased compost, as there wasn't much soil left, to take from Middle Ridge chicken coop. It's cheaper to buy it by the trailer load (and more environmentally friendly) than it is, to buy in bags.

I didn't take any photos of the second, finished bed, by itself. But I did snap a picture of the two beds (avocado tree in the middle) as we were installing trellis posts. This is where the beds were at, on the last day of July, this year.
We had to place more wire mesh (concrete rebar) over the top, to stop brush turkeys having a field day. We didn't quite escape that fiasco, but I'll share more when I do the update, of where the beds are at presently.

Spongy woody material
These logs also came from down in the gully, and were well and truly decayed. It didn't take much, to break pieces off, and find the soft, spongy material, left over from termite infestation.
This is the preferred wood for hugelkulture - logs which have spent some time in the elements, breaking down. Because it's pure feed for the plants which go into the bed, rather than drawing nutrients from the soil, in order to break down. It shouldn't matter if you use fresh logs, but it may take a year longer for the plants to benefit as much.

Fibrous bark
Instead of pumpkin vines, we added some passionfruit vines, to this bed, as we were removing it, at this point. Same soil and coffee grounds went into the base layers, but instead of large branches I used thick tree bark. It had been stripped from some saplings we took out and needed a use for.
I've read that eucalyptus isn't the best material to use for hugelkulture (which this bark is sourced from) as it takes ages to break down and can leave oils not favourable for plants. As long as it's had some time out in the elements (6 months to a year) and mixed with other materials though, it doesn't present much of a problem.

Prickly pear
Instead of Mother of millions succulent, we used prickly pear in the second bed. Again, using the reasoning of trapping moisture in the base layer, for plant roots to migrated down to. This was another resource our land grew, which can be considered a nuisance. But in removing it, and using it, the prickly pear becomes a valuable resource instead.

Twigs and coffee grounds
I still had plenty of twigs and smaller branches to use, from our endless resource of fallen trees. Acacias have a short lifespan around these parts, and so we have plenty of woody material to draw from.
Acacias are better wood to use in hugelkultur than eucalyptus, as they contain less oils and break down a lot quicker. But it's about using what your land produces, and just adding a range of materials from all that you have.
We filled the rest of this bed, with purchased compost, as there wasn't much soil left, to take from Middle Ridge chicken coop. It's cheaper to buy it by the trailer load (and more environmentally friendly) than it is, to buy in bags.
Last day of July
I didn't take any photos of the second, finished bed, by itself. But I did snap a picture of the two beds (avocado tree in the middle) as we were installing trellis posts. This is where the beds were at, on the last day of July, this year.
We had to place more wire mesh (concrete rebar) over the top, to stop brush turkeys having a field day. We didn't quite escape that fiasco, but I'll share more when I do the update, of where the beds are at presently.
Tuesday, October 11, 2016
Hugelkultur bed - part 1
If you're not familiar with Hugelkultur, here's a quick link to get you started. I wasn't sure if a Hugelkultur bed would work here, because we don't get the reliable precipitation to keep them hydrated. I knew from attempting to grow in our garden soil, the water we receive (or add artificially) never penetrates more than 10cm. So why go to all that trouble to build something which might not work?

(a) we were desperate to try anything in our hydrophobic vegetable garden, and (b) I had some garden infrastructure, getting in the way of an avodaco tree. It was a trellis we built, out of bent concrete rebar. We wanted to keep our volunteer avocado tree in the vegetable area, and had to give it more space.

As the volunteer seeding grew, it avoided putting out branches where the trellis was. I always thought we would remove the avocado tree, some time in the future, but I'm glad we didn't - choosing to remove the trellis instead. Because when it came out, I wanted to do something else with the wire mesh.
Why not build a raised bed? A hugelkultur one. As we already had an abundance of woody material, we wanted to put to good use around the property. Not to mention other things we discovered would be useful too. More on what we filled it with, soon.
Where it all began however, was back in June this year....

After pulling out the star-pickets holding up the trellis, then wresting the trellis from the weeds, I bent the mesh into a rectangular shape, and put it in the bed. About a metre space was given between the avocado tree and bed. It should be plenty of room for new branches to form.
At this stage however, I thought my avocado needed some drastic pruning, to encourage new branch development. I didn't know if it would hurt the tree, but I saw it struggle to produce fruit last year. It spent a lot of energy putting more height on (as seedling trees will do naturally) and dropped the fruit. Did I really need a tree that tall, in the vegetable patch anyway? Was it's natural form, suitable for the limited space it sprung up from - next to a retaining wall?
There's more to this avocado story, which I will tell another time. This particular post is about how we built our Hugelkultur raised beds. I came back to my new raised bed, in early July.

I wanted to cover the mesh in something, to keep the materials from falling out. We happened to have a large amount of black shade cloth gifted to us. It had been used for various reasons in the past, but was now sitting around, unloved and for us to trip over. So it was perfect for what we wanted it for.
It comes folded (all shade cloth does when you buy it) so it slipped neatly over the mesh on both sides. I did my best to bury it under ground where I could, used bricks and caps to weigh it down in other places - and wedged it down the corrugated iron side of the retaining wall (out of view). It wasn't glamorous, and neither was I after pushing, prodding, bending and digging it into place.
That first day of construction was pretty intense. Lots of grunt work, in other words. I still had enough time left in the afternoon however, to start filling it.

I dug below the natural soil level, only a little, then filled it with some tree trunks. They had been felled several years ago, and made perfect hugelkultur material to feed the soil. David helped to carry it up from the lower gully, where it was taken.
Then came another idea for materials. As we don't normally get a lot of precipitation, I wondered if we could use the succulent weed (mother of millions) which was growing nearby. We're always trying to get rid of it, and here was the perfect opportunity. Bury it! Having such a moisture filled plant on the thickest log, might help it retain moisture longer. Which is where I wanted all the plant roots to go - down. Not up on the surface, where all the moisture gets evaporated during summer.

I'm a firm advocate of using what your land produces. And in our mostly arid climate, succulent weeds grow really well! Coupled with the wood, microbes and insects which populate this bed (all leaving their bodily excretions and rotting corpses) it might stand a chance of staying moist under ground, despite our low precipitation rate.
So that was that, for my second attempt at constructing our hugelkultur bed. On the third attempt (next day) I had to chase up more materials. It was quite a large bed, after all.

Which had me revisiting the old, Middle Ridge chicken coop. Yes, it's been completely invaded by weeds, but the local quail population seem to love it! I would often startle them, as they evacuated by the open air ceiling. This day I visited, was no different.
I still have plans to do something with Middle Ridge, but it will have to wait it's turn. In the meantime, I needed the soil I had built up, in previous years vegetable gardening attempts. So I employed my trusty mattock (golly, that tool gets a workout) and my barrow, to start escavating.

Barrow by barrow, I started to cover the mother of millions, succulents, I'd placed in last. When I stopped for morning tea, I also threw in my muffin wrapper too. It will just become more food, for later.
Then came several treks up to the top swale, near Hilltop chicken coop. Where I had a stash of short lived trees, which had fallen down in the wind - as they tend to do nearly every year.

I cut them up, and placed them in the bed next. So I needed my little handsaw for that exercise. I love using hand tools, especially during winter, when it can warm you up.
Anyway, The theory with Hugelkultur is, you start with the largest logs that take the longest to break down, at the very base of your bed. Then work up to the branches, with the last layer of all, being lots of twiggy material.

I know earthworms seem to go crazy over coffee grounds, so David brought several buckets of coffee grounds from his workplace to go into the bed. It came complete with orange fungi, which smelled just like Jaffa - you know, orange chocolate. Not that I put my nose too close, mind you. The fungi should get the decaying process, under way, quickly.
I don't drink coffee any more, but I still love the smell of it as I'm working. So it's a real treat when I get to work with such large amounts in the garden. Please do ask at your local coffee shop, if you can relieve them of their waste coffee grounds. They only have to pay to have it thrown out.

I think my cat likes the smell of coffee grounds too. She watched me diligently cart twigs down the hill, by the barrow load, and place them in the bed. Calm as you please - taking turns to sniff between the hugelkultur bed, and my legs. I'm not sure how such a lazy co-worker seems to encourage me in the garden so much. Maybe it's the way she squints, as if to say, good work - and - I'm glad you're doing it?
Thanks coach! Back to work then...which included several more barrows of dirt from Middle Ridge. You can begin to appreciate why it took several days to put it all together.

Hugelkultur also provides the perfect opportunity to clean up those scrap bits of wood, you always intended to use, but the elements get to it first. I found some old pallet wood, and put them in the bed, complete with nails. As its down a ways in the bed, I don't have to worry about coming across any rusty nails in future, when planting out.

I also grabbed some pumpkin vines which the mower went over. Pumpkin vines also contain a considerable amount of moisture in their stalks, so if any pumpkin vines have to come out at your place, consider how best you can use them. They work as hugelkultur material, but I've also mulched with them before too. Breaks down quickly and feeds the soil.
We didn't quite have enough soil to fill the bed, but we did have some leftover compost David bought, which was perfect for the surface. As any new seedlings will get a good start.

Now this is what I call a good co-worker...unlike a certain cat I know, and love. Spreading sugar cane mulch, is one of his favourite jobs to do in the garden. Which we did after the bed was filled with compost. David helped with that part, and at that point, I was happy for the extra grunt - as mine had just about run out.
The best part about building raised beds, is getting to plant them out. Which has been done successfully. But I first want to tell you about the avocado tree, and the second bed we made. So another post or two, to come.

September 2015
trellis, left - avocado, right
(a) we were desperate to try anything in our hydrophobic vegetable garden, and (b) I had some garden infrastructure, getting in the way of an avodaco tree. It was a trellis we built, out of bent concrete rebar. We wanted to keep our volunteer avocado tree in the vegetable area, and had to give it more space.

October 2015, Purple King beans ~
climbing the trellis
As the volunteer seeding grew, it avoided putting out branches where the trellis was. I always thought we would remove the avocado tree, some time in the future, but I'm glad we didn't - choosing to remove the trellis instead. Because when it came out, I wanted to do something else with the wire mesh.
Why not build a raised bed? A hugelkultur one. As we already had an abundance of woody material, we wanted to put to good use around the property. Not to mention other things we discovered would be useful too. More on what we filled it with, soon.
Where it all began however, was back in June this year....

June (winter) 2016
After pulling out the star-pickets holding up the trellis, then wresting the trellis from the weeds, I bent the mesh into a rectangular shape, and put it in the bed. About a metre space was given between the avocado tree and bed. It should be plenty of room for new branches to form.
At this stage however, I thought my avocado needed some drastic pruning, to encourage new branch development. I didn't know if it would hurt the tree, but I saw it struggle to produce fruit last year. It spent a lot of energy putting more height on (as seedling trees will do naturally) and dropped the fruit. Did I really need a tree that tall, in the vegetable patch anyway? Was it's natural form, suitable for the limited space it sprung up from - next to a retaining wall?
There's more to this avocado story, which I will tell another time. This particular post is about how we built our Hugelkultur raised beds. I came back to my new raised bed, in early July.

July 2016
I wanted to cover the mesh in something, to keep the materials from falling out. We happened to have a large amount of black shade cloth gifted to us. It had been used for various reasons in the past, but was now sitting around, unloved and for us to trip over. So it was perfect for what we wanted it for.
It comes folded (all shade cloth does when you buy it) so it slipped neatly over the mesh on both sides. I did my best to bury it under ground where I could, used bricks and caps to weigh it down in other places - and wedged it down the corrugated iron side of the retaining wall (out of view). It wasn't glamorous, and neither was I after pushing, prodding, bending and digging it into place.
That first day of construction was pretty intense. Lots of grunt work, in other words. I still had enough time left in the afternoon however, to start filling it.

Base layer
I dug below the natural soil level, only a little, then filled it with some tree trunks. They had been felled several years ago, and made perfect hugelkultur material to feed the soil. David helped to carry it up from the lower gully, where it was taken.
Then came another idea for materials. As we don't normally get a lot of precipitation, I wondered if we could use the succulent weed (mother of millions) which was growing nearby. We're always trying to get rid of it, and here was the perfect opportunity. Bury it! Having such a moisture filled plant on the thickest log, might help it retain moisture longer. Which is where I wanted all the plant roots to go - down. Not up on the surface, where all the moisture gets evaporated during summer.

Mother of millions
I'm a firm advocate of using what your land produces. And in our mostly arid climate, succulent weeds grow really well! Coupled with the wood, microbes and insects which populate this bed (all leaving their bodily excretions and rotting corpses) it might stand a chance of staying moist under ground, despite our low precipitation rate.
So that was that, for my second attempt at constructing our hugelkultur bed. On the third attempt (next day) I had to chase up more materials. It was quite a large bed, after all.

Former, Middle Ridge chicken run
Which had me revisiting the old, Middle Ridge chicken coop. Yes, it's been completely invaded by weeds, but the local quail population seem to love it! I would often startle them, as they evacuated by the open air ceiling. This day I visited, was no different.
I still have plans to do something with Middle Ridge, but it will have to wait it's turn. In the meantime, I needed the soil I had built up, in previous years vegetable gardening attempts. So I employed my trusty mattock (golly, that tool gets a workout) and my barrow, to start escavating.

Soil from the coop, now in the raised bed
Barrow by barrow, I started to cover the mother of millions, succulents, I'd placed in last. When I stopped for morning tea, I also threw in my muffin wrapper too. It will just become more food, for later.
Then came several treks up to the top swale, near Hilltop chicken coop. Where I had a stash of short lived trees, which had fallen down in the wind - as they tend to do nearly every year.

Tree branches
I cut them up, and placed them in the bed next. So I needed my little handsaw for that exercise. I love using hand tools, especially during winter, when it can warm you up.
Anyway, The theory with Hugelkultur is, you start with the largest logs that take the longest to break down, at the very base of your bed. Then work up to the branches, with the last layer of all, being lots of twiggy material.

Coffee grounds
I know earthworms seem to go crazy over coffee grounds, so David brought several buckets of coffee grounds from his workplace to go into the bed. It came complete with orange fungi, which smelled just like Jaffa - you know, orange chocolate. Not that I put my nose too close, mind you. The fungi should get the decaying process, under way, quickly.
I don't drink coffee any more, but I still love the smell of it as I'm working. So it's a real treat when I get to work with such large amounts in the garden. Please do ask at your local coffee shop, if you can relieve them of their waste coffee grounds. They only have to pay to have it thrown out.

Twigs and cat
I think my cat likes the smell of coffee grounds too. She watched me diligently cart twigs down the hill, by the barrow load, and place them in the bed. Calm as you please - taking turns to sniff between the hugelkultur bed, and my legs. I'm not sure how such a lazy co-worker seems to encourage me in the garden so much. Maybe it's the way she squints, as if to say, good work - and - I'm glad you're doing it?
Thanks coach! Back to work then...which included several more barrows of dirt from Middle Ridge. You can begin to appreciate why it took several days to put it all together.

Old pallet wood
Hugelkultur also provides the perfect opportunity to clean up those scrap bits of wood, you always intended to use, but the elements get to it first. I found some old pallet wood, and put them in the bed, complete with nails. As its down a ways in the bed, I don't have to worry about coming across any rusty nails in future, when planting out.

Pumpkin vine
I also grabbed some pumpkin vines which the mower went over. Pumpkin vines also contain a considerable amount of moisture in their stalks, so if any pumpkin vines have to come out at your place, consider how best you can use them. They work as hugelkultur material, but I've also mulched with them before too. Breaks down quickly and feeds the soil.
We didn't quite have enough soil to fill the bed, but we did have some leftover compost David bought, which was perfect for the surface. As any new seedlings will get a good start.

Mulching!
Now this is what I call a good co-worker...unlike a certain cat I know, and love. Spreading sugar cane mulch, is one of his favourite jobs to do in the garden. Which we did after the bed was filled with compost. David helped with that part, and at that point, I was happy for the extra grunt - as mine had just about run out.
The best part about building raised beds, is getting to plant them out. Which has been done successfully. But I first want to tell you about the avocado tree, and the second bed we made. So another post or two, to come.
Sunday, October 9, 2016
The dirt movers
I've been quiet on this blog lately, but it doesn't mean we've been taking it easy. In fact, we have a few projects in the pipelines, which mean deadlines have been set and targets planned. So maybe you can guess what's going on here?

Obviously something is going on, with that rickety ramp. Maybe another picture, will provide more clues?

This is the close-up of what we're doing, but it's not entirely confined to this place alone. But this is where we have to concentrate all our efforts for now. At this point, November 2nd, is the deadline we have to meet.

Of course, with a toddler on site, who'd rather play and help occasionally, it makes sense to build an obstacle course into ground zero. It keeps them entertained indefinitely. Who could resist climbing those stairs and traversing that bridge?
We have David to thank for this brilliant idea, as he remembers loving to visit construction sites (when he could find ways to be undetected) and making a game out of the piles of rubble. So he channelled his inner child, and got creative. It has worked, keeping Peter out of the way of a swinging mattock! Well, most of the time.

David needs to excavate these tree roots, so he can remove them. We don't trust an excavator so close to our infrastructure, and we wanted to remove the tree roots carefully. Besides that however, it saves us money and we get a little fitter working as a team. We carted 20 barrows of dirt, today! But we've been doing this for several days now.

Of course, you've figured we're moving dirt, right? But why are we doing so? I'm happy to report, we should be taking receipt of a second 5400 gallon, rainwater tank in the first week of November. Which will double our rainwater supply.
When rainwater is your only water supply, it's important to have enough. In the nearly 10 years we've been here, we've only had to call a water truck in twice, but we'd like not to do that in future. As the truck has problems getting down our driveway and they don't have a hose long enough to reach from the street.
But we also have two kids, which in next to no time will become young adults. One is already knocking on the door of that venture. While we've always taught them to conserve water, the clothes will only increase in size (meaning more washing loads) and the need for showers will only increase too. So we're excavating, to be ready for November - it all has to happen.
In the meantime, what to do with all that extra dirt? Well thanks to these guys...

...all fourteen of them, and growing bigger every day! We needed to make some more flat land, to run another tractor on. Logistically, we need to move this tractor twice a day, at the rate they're eating and compacting the ground underneath.
Making flat land though, we can do now!

This is just below the house, and it has a gentle slope. But it has dips and plenty of uneven ground. The rain doesn't stay long enough on the slope to sink in, but with the addition of more soil, to level the slope, we can ensure the water doesn't run off as quickly. Maybe then, we can grow some feed for another chicken tractor to run over.

I'm reminded of the permaculture principle, to have more than one purpose in your design. So it was nice to realise, as we knuckled down and moved dirt to meet the deadline for our rainwater tank - we were also making flat land to cater for our increase in livestock.
So the pay-off for the labour invested, met two objectives. Effectively, doubling our return. We've also spread the cost of the rainwater tank, to also meet the new feed requirement for the chickens, without spending any more money. It just took our labour and some hand tools.

This is what the slope looked like originally. We forgot to take before photos, but this one from 2010, adequately represents the sloping nature of the land. It remained green in the wet season, but struggled in the dry. I also didn't want to have a chicken tractor, permanently tilting sideways.
So we'll be busy moving dirt and no doubt, building new chicken tractors soon! All this is long overdue, but we've set some pretty good objectives now to meet. In fact, we've also set a deadline, to have all earthworks on the North facing slope (the areas immediately around the house) before it meets the lower gully, completed in twelve months time.
We've got until October 2017, to meet that objective. We're planning to have all that done by hand too.
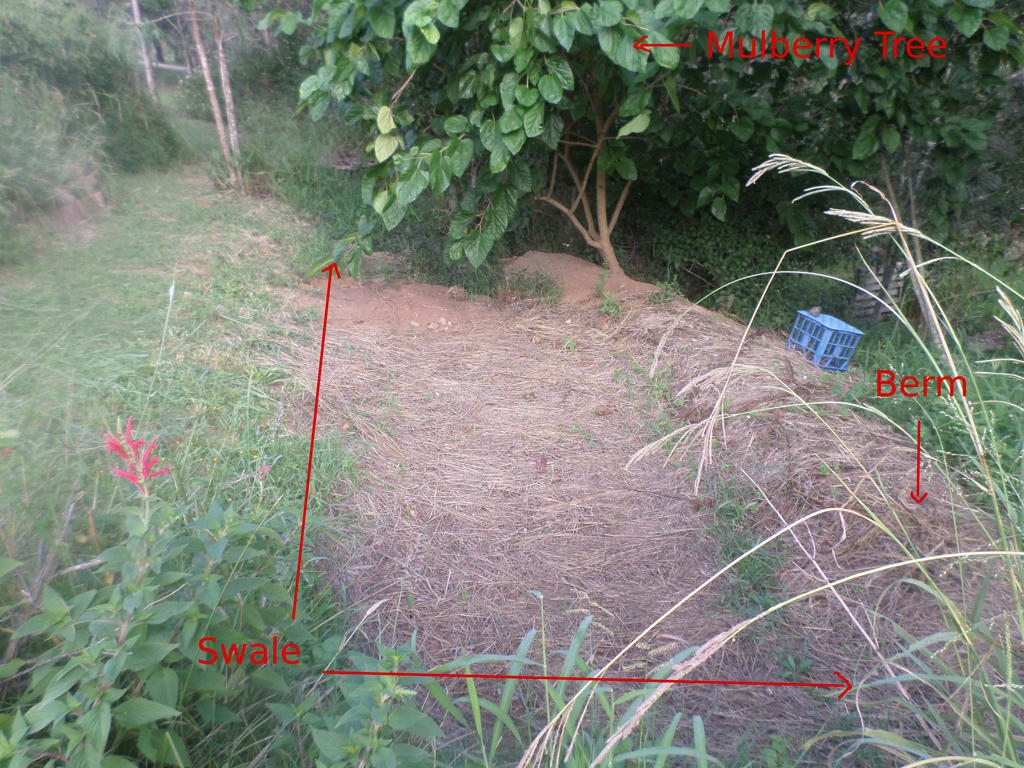
Which means finishing this swale, started back in 2015, and building the swale underneath it as well. Which will require dumping dirt from elsewhere, as the slope is too steep, to cut into. We need to raise the land to build the second swale instead.
It will also require, building one of the largest hugelkultur mounds we will ever attempt. We're talking several, 40 metre trees worth of mound! We're in our early forties now, so we're still young enough to do these things. But if we keep putting them off, like we have been (simply doing other important things) it will never get done.
So we want to meet the objectives we've set, or at least come extremely close. Setting a deadline helps to keep our time organised better, and our efforts focused. It will be nice to know, all immediate areas around the house won't need more earthworks done, after next year. Any earth moving required elsewhere on the property, can be done at our leisure - which will be more in tune with our ageing process. And we can relax knowing, we can call it quits any time, and it won't effect the areas around the house.
So that's what we'll be up to for a while. I'm looking forward to sharing all the dirt with you guys!!

Work site
Obviously something is going on, with that rickety ramp. Maybe another picture, will provide more clues?

Ground zero
This is the close-up of what we're doing, but it's not entirely confined to this place alone. But this is where we have to concentrate all our efforts for now. At this point, November 2nd, is the deadline we have to meet.

Step by step
Of course, with a toddler on site, who'd rather play and help occasionally, it makes sense to build an obstacle course into ground zero. It keeps them entertained indefinitely. Who could resist climbing those stairs and traversing that bridge?
We have David to thank for this brilliant idea, as he remembers loving to visit construction sites (when he could find ways to be undetected) and making a game out of the piles of rubble. So he channelled his inner child, and got creative. It has worked, keeping Peter out of the way of a swinging mattock! Well, most of the time.

The land iceberg
David needs to excavate these tree roots, so he can remove them. We don't trust an excavator so close to our infrastructure, and we wanted to remove the tree roots carefully. Besides that however, it saves us money and we get a little fitter working as a team. We carted 20 barrows of dirt, today! But we've been doing this for several days now.

Making channels
Of course, you've figured we're moving dirt, right? But why are we doing so? I'm happy to report, we should be taking receipt of a second 5400 gallon, rainwater tank in the first week of November. Which will double our rainwater supply.
When rainwater is your only water supply, it's important to have enough. In the nearly 10 years we've been here, we've only had to call a water truck in twice, but we'd like not to do that in future. As the truck has problems getting down our driveway and they don't have a hose long enough to reach from the street.
But we also have two kids, which in next to no time will become young adults. One is already knocking on the door of that venture. While we've always taught them to conserve water, the clothes will only increase in size (meaning more washing loads) and the need for showers will only increase too. So we're excavating, to be ready for November - it all has to happen.
In the meantime, what to do with all that extra dirt? Well thanks to these guys...

Late September 2016
...all fourteen of them, and growing bigger every day! We needed to make some more flat land, to run another tractor on. Logistically, we need to move this tractor twice a day, at the rate they're eating and compacting the ground underneath.
Making flat land though, we can do now!

Facing east
This is just below the house, and it has a gentle slope. But it has dips and plenty of uneven ground. The rain doesn't stay long enough on the slope to sink in, but with the addition of more soil, to level the slope, we can ensure the water doesn't run off as quickly. Maybe then, we can grow some feed for another chicken tractor to run over.

Facing west
I'm reminded of the permaculture principle, to have more than one purpose in your design. So it was nice to realise, as we knuckled down and moved dirt to meet the deadline for our rainwater tank - we were also making flat land to cater for our increase in livestock.
So the pay-off for the labour invested, met two objectives. Effectively, doubling our return. We've also spread the cost of the rainwater tank, to also meet the new feed requirement for the chickens, without spending any more money. It just took our labour and some hand tools.

March, 2010
This is what the slope looked like originally. We forgot to take before photos, but this one from 2010, adequately represents the sloping nature of the land. It remained green in the wet season, but struggled in the dry. I also didn't want to have a chicken tractor, permanently tilting sideways.
So we'll be busy moving dirt and no doubt, building new chicken tractors soon! All this is long overdue, but we've set some pretty good objectives now to meet. In fact, we've also set a deadline, to have all earthworks on the North facing slope (the areas immediately around the house) before it meets the lower gully, completed in twelve months time.
We've got until October 2017, to meet that objective. We're planning to have all that done by hand too.
March 2015
Which means finishing this swale, started back in 2015, and building the swale underneath it as well. Which will require dumping dirt from elsewhere, as the slope is too steep, to cut into. We need to raise the land to build the second swale instead.
It will also require, building one of the largest hugelkultur mounds we will ever attempt. We're talking several, 40 metre trees worth of mound! We're in our early forties now, so we're still young enough to do these things. But if we keep putting them off, like we have been (simply doing other important things) it will never get done.
So we want to meet the objectives we've set, or at least come extremely close. Setting a deadline helps to keep our time organised better, and our efforts focused. It will be nice to know, all immediate areas around the house won't need more earthworks done, after next year. Any earth moving required elsewhere on the property, can be done at our leisure - which will be more in tune with our ageing process. And we can relax knowing, we can call it quits any time, and it won't effect the areas around the house.
So that's what we'll be up to for a while. I'm looking forward to sharing all the dirt with you guys!!
Tuesday, October 4, 2016
Propagating pineapples
Pineapples would have to be one of the easiest plants to propagate. And they should be, considering they're related to the bromeliad family. In other words, they maintain a lot of moisture in their stems and/or leaves. But being easy to propagate, doesn't mean they're immune to killing without the appropriate considerations.
If you're someone who takes a while to complete tasks, then chances are, you'll be successful at propagating pineapples. And here's why...

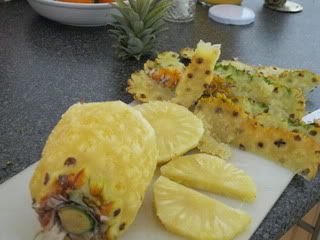
First of all, we start with the pineapple top, or sometimes called the crown. Technically, it's the bracts, or rosette of leaves, which grow in a spiral on top of the pineapple fruit. It's these bracts, we need to propagate the plant with.
At the fruit store recently, we purchased a triple header - meaning it sprouted three separate rosettes, from the one pineapple fruit. It was a good investment, as we planned to get three plants out of it. First, we chopped the top from the fruit, and it sat on the bench for a week and a bit. I honestly can't remember how long. Pineapple tops last for ages.

Now YOU don't have to leave them on the bench, for that long. It's just something which happens around here. By the time we got to it, the flesh left on the crown, was so soft, it was extremely easy to pull out the core. But you don't want to keep the flesh on the crown indefinitely. As this can grow mould and rot the parts you want to sprout roots from. So plan to remove all yellow pineapple flesh, prior to propagating.

You can skip this step if you only have one rosette to deal with, but if you have more, simply pull them apart with your hands. Or a knife, if that's easier. The fibrous core is what we want to sprout roots from, and they need a little extra treatment to do so successfully.

The rosette on the left has been treated, by removing any yellow flesh, and pulling off the leaves, one by one. So you're left with a fibrous rhizome and a few leaves. This rhizome, is what gets planted under the soil to sprout roots and grow subsequent new leaves. So don't worry about losing too many leaves in this process.
In fact, I try and take off as many leaves as possible, because it helps to keep the plant upright, before the roots have a chance to secure the soil. Otherwise you end up with tops that fall out, or lean too much. Especially if they're exposed to the wind outside.

These are the three pineapple tops, freshly prepared and ready to go into the soil. Now you can prepare the tops like this, right after you eat the pineapple, or whenever you get around it - like we do. However, there's another step before it can make contact with moisture. Which is to leave it to dry, for at least three days. This is so the fresh rhizome you've just created, has a chance to callous over.

These are the same pineapple tops, after three days. They're now healed over, and won't grow mould or fungi, which could rot them, when they come in contact with the damp soil.
Which is why you should also plant them in a free-draining potting mix. Watering them only when the soil needs it. Pineapples actually need very little water to grow. In fact, I would say too much water is probably what kills most pineapple propagation attempts.
Their leaves also cannot handle strong fertiliser, so never feel like you must pamper your pineapples. The best fertility to give a pineapple, is to position them near other plants, which will drop leaf mulch. Or provide your own mulch, with the odd banana skin or other organic matter on the soil.

In an agreeable climate (they prefer subtropical conditions) they can fruit within 24 months. Maybe that's a long time to wait, but have you ever tried fresh pineapple? Sweet sunshine in your mouth, and so tender, you can even eat the core! That's why I keep propagating pineapples. When we tried our first in 2011, I was destined to continue propagating them.
If you don't have a subtropical climate, you could try experimenting with micro-climates, using heat sinks, such as north facing walls or any kind of rock structure. If you're fortunate to have a greenhouse, even better!
Happy propagating, and may all your pineapples, grow fat and sweet.
If you're someone who takes a while to complete tasks, then chances are, you'll be successful at propagating pineapples. And here's why...

Propagation material
First of all, we start with the pineapple top, or sometimes called the crown. Technically, it's the bracts, or rosette of leaves, which grow in a spiral on top of the pineapple fruit. It's these bracts, we need to propagate the plant with.
At the fruit store recently, we purchased a triple header - meaning it sprouted three separate rosettes, from the one pineapple fruit. It was a good investment, as we planned to get three plants out of it. First, we chopped the top from the fruit, and it sat on the bench for a week and a bit. I honestly can't remember how long. Pineapple tops last for ages.

A little too soft
Now YOU don't have to leave them on the bench, for that long. It's just something which happens around here. By the time we got to it, the flesh left on the crown, was so soft, it was extremely easy to pull out the core. But you don't want to keep the flesh on the crown indefinitely. As this can grow mould and rot the parts you want to sprout roots from. So plan to remove all yellow pineapple flesh, prior to propagating.

Dividing
You can skip this step if you only have one rosette to deal with, but if you have more, simply pull them apart with your hands. Or a knife, if that's easier. The fibrous core is what we want to sprout roots from, and they need a little extra treatment to do so successfully.

Less is more
The rosette on the left has been treated, by removing any yellow flesh, and pulling off the leaves, one by one. So you're left with a fibrous rhizome and a few leaves. This rhizome, is what gets planted under the soil to sprout roots and grow subsequent new leaves. So don't worry about losing too many leaves in this process.
In fact, I try and take off as many leaves as possible, because it helps to keep the plant upright, before the roots have a chance to secure the soil. Otherwise you end up with tops that fall out, or lean too much. Especially if they're exposed to the wind outside.

Prepared
These are the three pineapple tops, freshly prepared and ready to go into the soil. Now you can prepare the tops like this, right after you eat the pineapple, or whenever you get around it - like we do. However, there's another step before it can make contact with moisture. Which is to leave it to dry, for at least three days. This is so the fresh rhizome you've just created, has a chance to callous over.

Ready to plant
These are the same pineapple tops, after three days. They're now healed over, and won't grow mould or fungi, which could rot them, when they come in contact with the damp soil.
Which is why you should also plant them in a free-draining potting mix. Watering them only when the soil needs it. Pineapples actually need very little water to grow. In fact, I would say too much water is probably what kills most pineapple propagation attempts.
Their leaves also cannot handle strong fertiliser, so never feel like you must pamper your pineapples. The best fertility to give a pineapple, is to position them near other plants, which will drop leaf mulch. Or provide your own mulch, with the odd banana skin or other organic matter on the soil.
2011
In an agreeable climate (they prefer subtropical conditions) they can fruit within 24 months. Maybe that's a long time to wait, but have you ever tried fresh pineapple? Sweet sunshine in your mouth, and so tender, you can even eat the core! That's why I keep propagating pineapples. When we tried our first in 2011, I was destined to continue propagating them.
If you don't have a subtropical climate, you could try experimenting with micro-climates, using heat sinks, such as north facing walls or any kind of rock structure. If you're fortunate to have a greenhouse, even better!
Happy propagating, and may all your pineapples, grow fat and sweet.
Subscribe to:
Posts (Atom)