Showing posts with label Weekend projects. Show all posts

Monday, February 4, 2019

Vertical space

We have a modest sized, four bedroom house, so you'd think, space isn't a problem. Without a proper garage/workshop outside though, most of my power tools and DIY supplies, live inside the house. Which makes for quite the squeeze, in our two main linen cupboards.

Naturally, I've had to find inventive ways, to maximise storage space anywhere else I can in the house. Enter, vertical space! I've touched on this subject, previously, when I wrote about Weekend Projects Inside. I wanted to share how some of those storage solutions, worked, as well as some of the extensions I've made, recently too.


 July, 2015 
baking cabinet ~ still in use


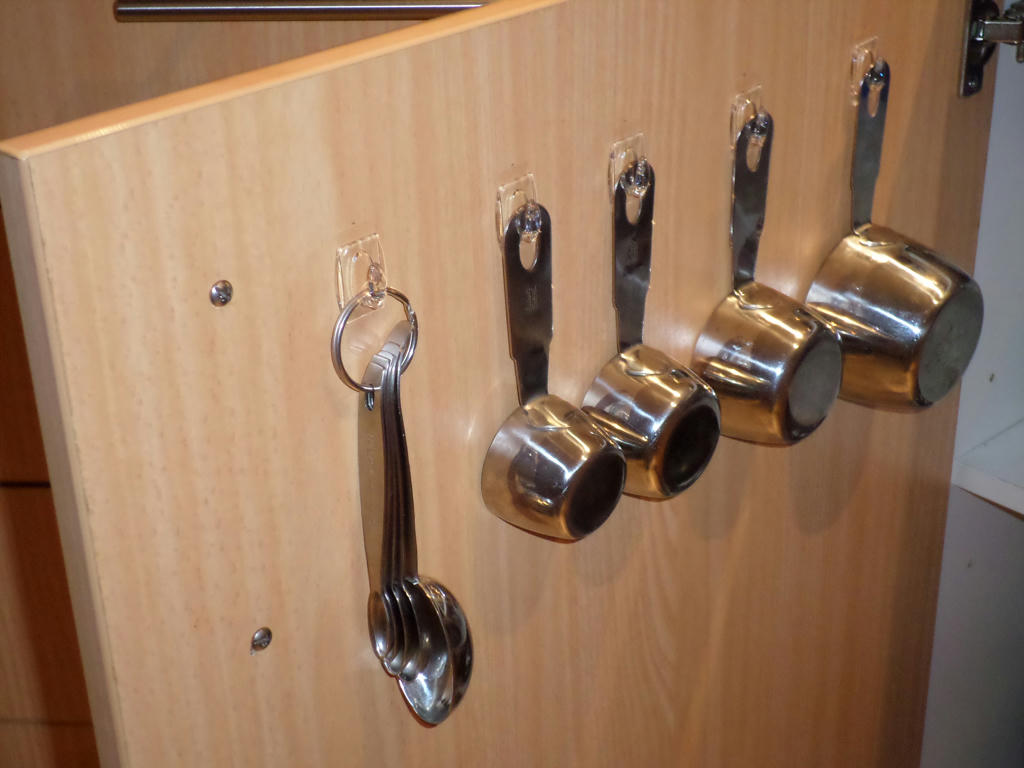
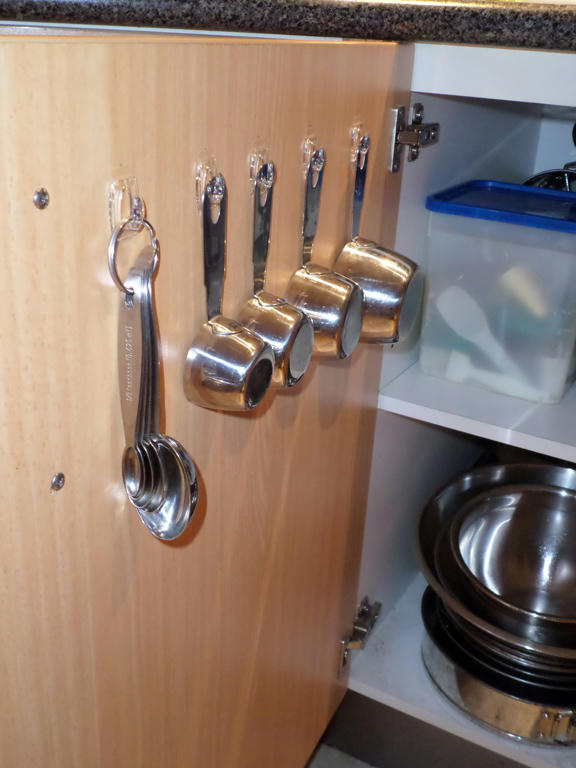
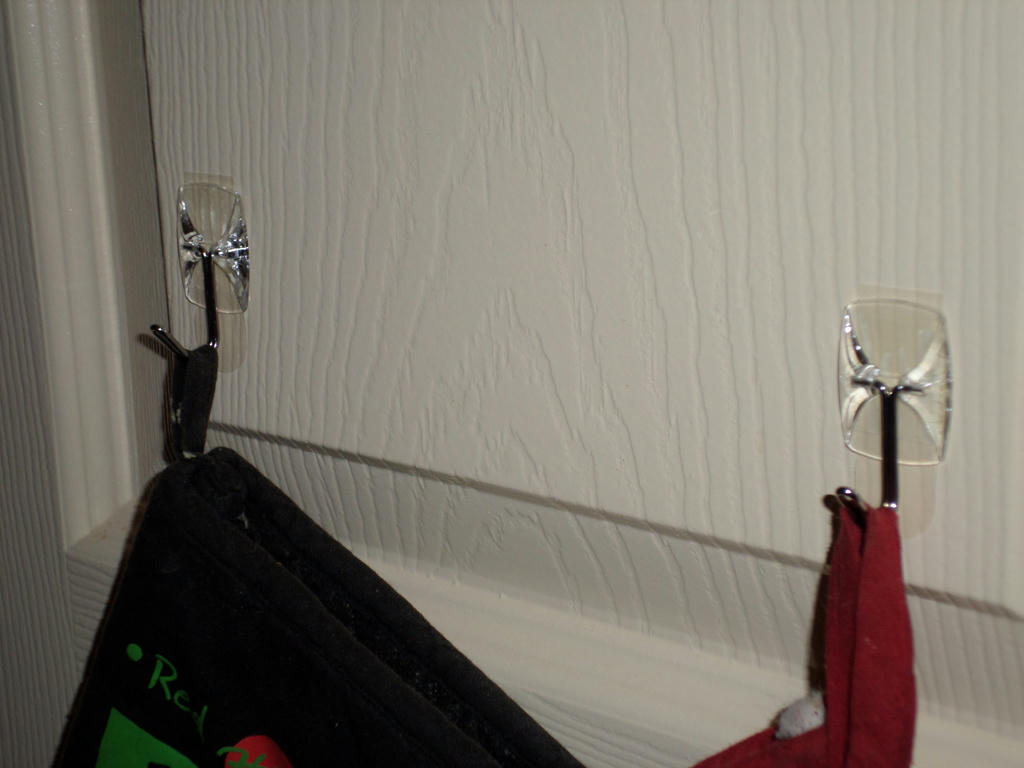
Inside the kitchen cabinets, I shared how the wonders of adhesive hooks, worked at arranging some of my cooking tools. I'm happy to report, in almost four years of opening and closing that door - none of the "Command" brand adhesive hooks, have come undone.

It's saved so much time, having the measurement tools I use often (for baking, fermentation, and all kinds of meal preparations) right there. Instead of rummaging through items I don't use as much. So when deciding what items you will hang, favour what you will use the most.


January, 2019
baking cabinet - new addition


I made a little extension to this particular door, recently. The item I chose to hang, does break the rule about being the most frequently used item. As it's not. But there are good reasons for it making the cut, as well.

As my attempts at preserving, have increased over the years, the wide-mouth jars I prefer to use, are hard to break the seal, by hand. Enter, the jar opener! It's very simple, and replaces the old spoon trick I used formerly.

While, I don't need to use a jar opener as regularly as my measurement tools, I hung it for safety reasons. Because it shared drawer space with other sharp utensils, like an arrangement of different chef knives and hand graters. So hang mismatched items, if it removes them from a more hazardous location.


 January 2019
Utility/linen cupboard ~ still in use


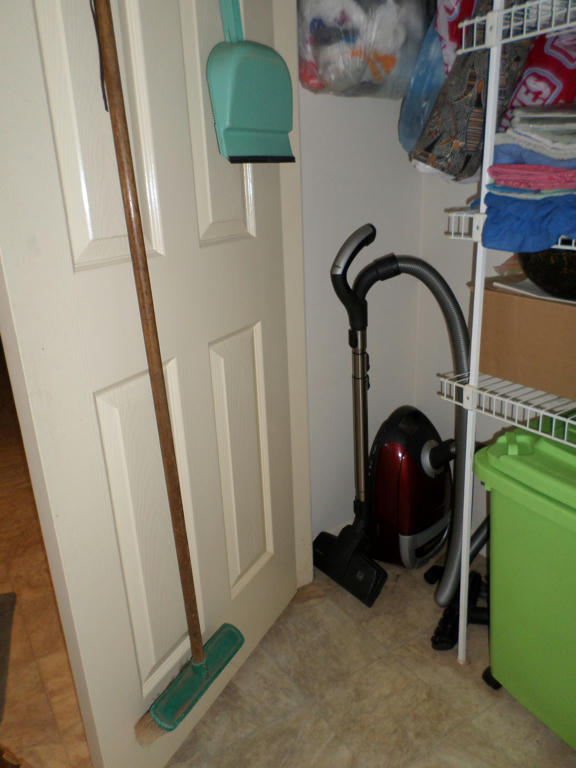
Speaking of hazards, do you remember that utility cupboard door, I hung our brooms and dustpans from? I no longer had the danger of broom handles, falling on my head, while attempting to get the vacuum cleaner out of the cupboard. As the sweeping implements, were formerly stored on the floor, with the vacuum cleaner. 

While it can still, sometimes be a struggle to get the vacuum cleaner out (always the way, with bulky items) the adhesive hooks have not wavered. So still no endangerment of falling brooms on my head!


 January 2019
Utility/linen cupboard ~ new addition


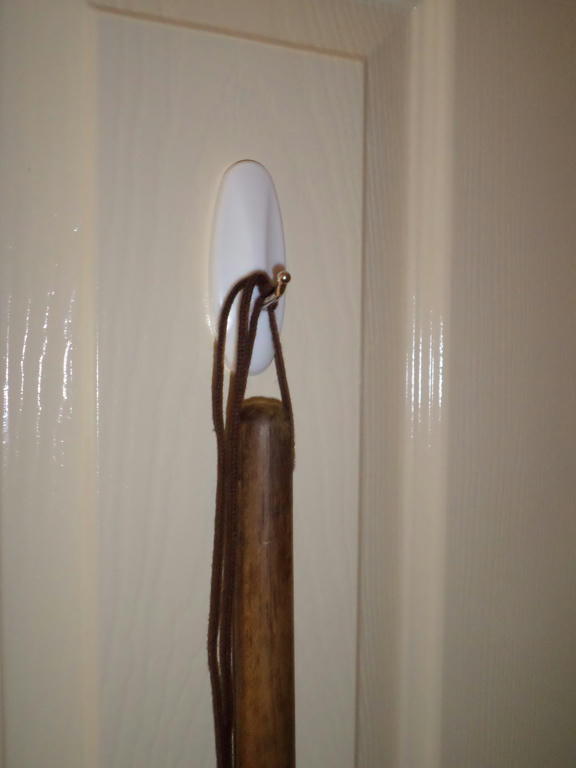
I made a recent addition, to the adjoining door. It's a safe place to hang our fire blanket. Formerly, it was sitting under the kitchen sink. While it was close to the stove in that position, the blanket was made to be fixed to a wall, and accessed quickly from the base. So the linen cupboard was a better choice, even if it was a few more metres away. 


July 2015
Stove, cabinet ~ still in use


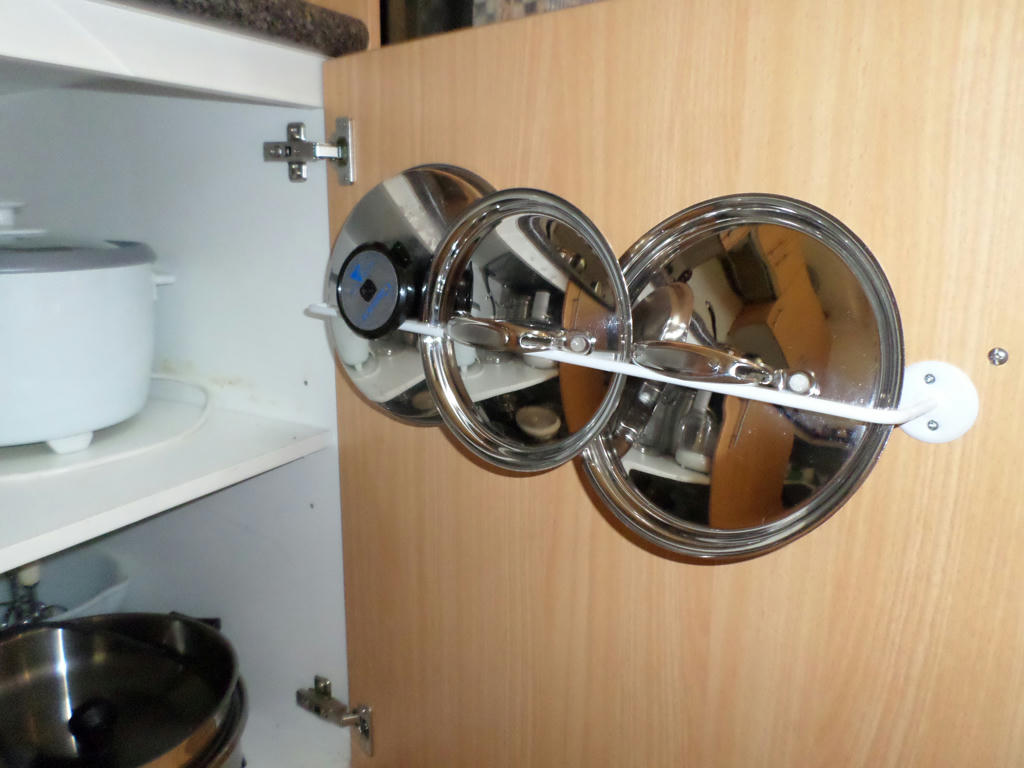
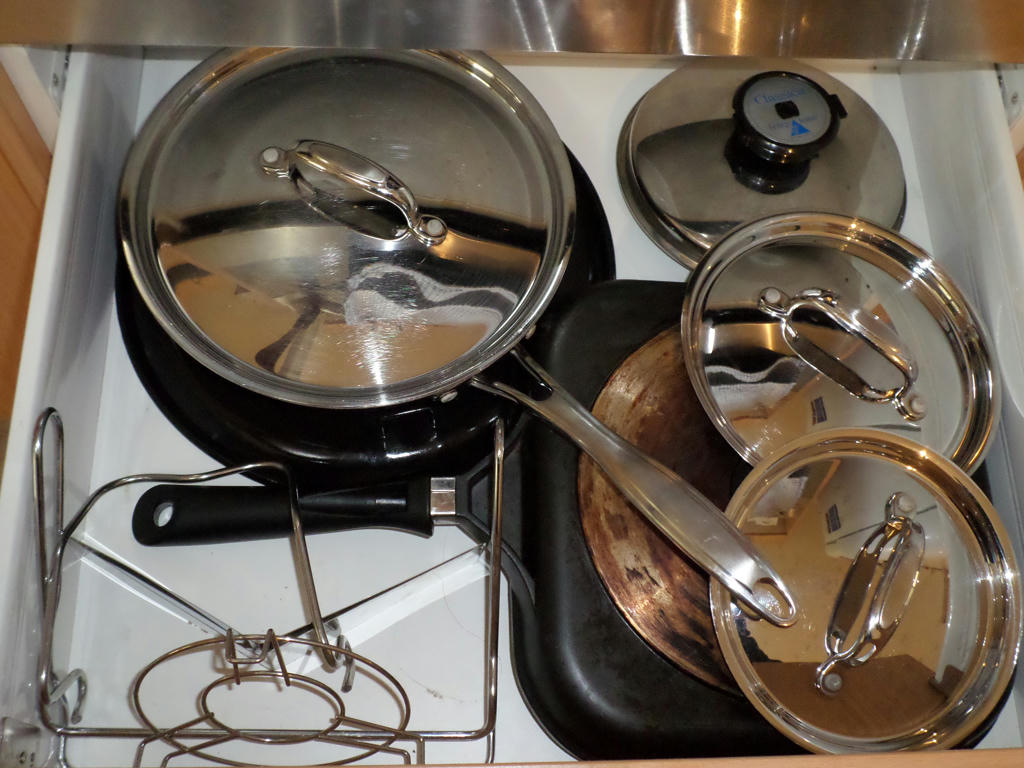
The saucepan lid holder, has performed well over the four year period, too. Although I'm surprised, how little, I actually use them in comparison to the saucepans. But it did the job of clearing out drawer space, to access frying pans, better.

One thing worth noting, is how you will lose the equivalent storage space, inside your cabinet. If there is lots of bulky equipment inside, like mine, you may not have the cabinet space to sacrifice. I'm glad I only used this small portion of the cabinet door, and have the majority of the cavity, free for bulky equipment.

I'm still happy I divided the saucepan lids, from the frying pans. But I'm equally glad, I didn't go crazy hanging stuff inside THIS particular cabinet. So consider the internal cabinet space, you will be sacrificing, by hanging things from the door. There will be certain cabinets, this is just not a good fit for. Literally.


July 2015
Kitchen pantry ~ still in use


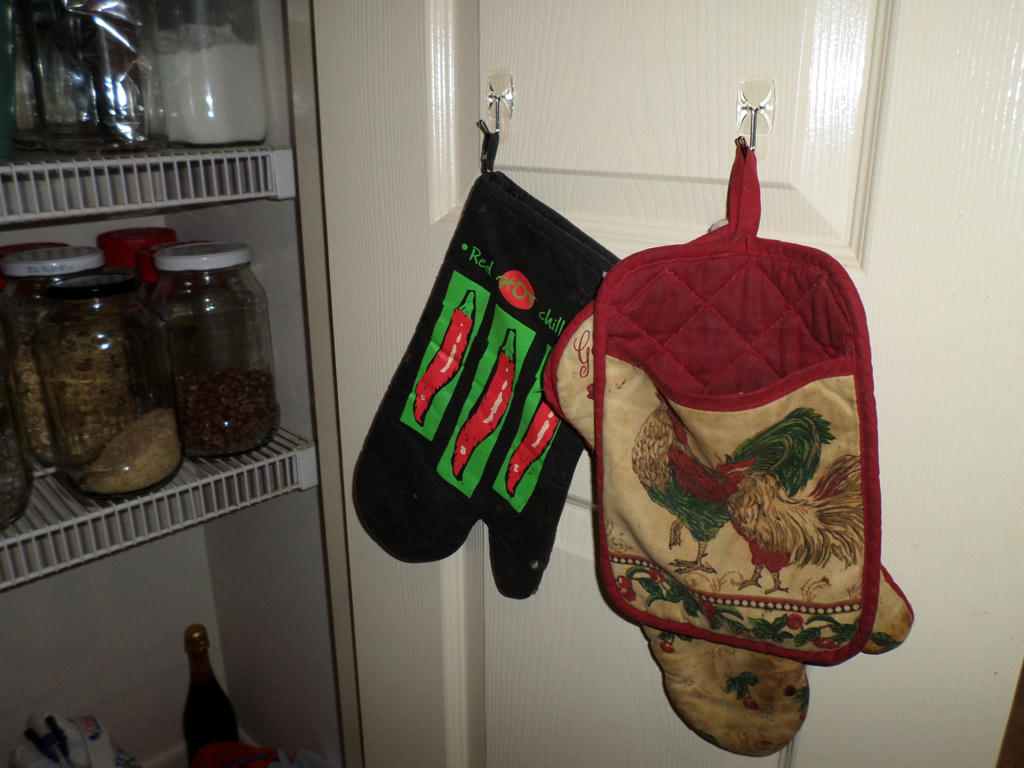
How have my oven-mitts, hung inside the pantry door, performed over the years? The hooks have not faltered, even with the fluctuating temperatures that can happen between summer and winter. Heat, is generally the undoing of most adhesive hooks. Of all the "Command" brand hooks I've used, they've not lost their adhesion, all this time.

Do I regret having my oven-mitts, a little further away from the oven though? Not really. I tend to get them out, and leave them near the stove, when something is baking anyway. Otherwise, they can happily live inside the pantry, and I can have my bench space, back.


July 2015
Sink, cabinet ~ still in use


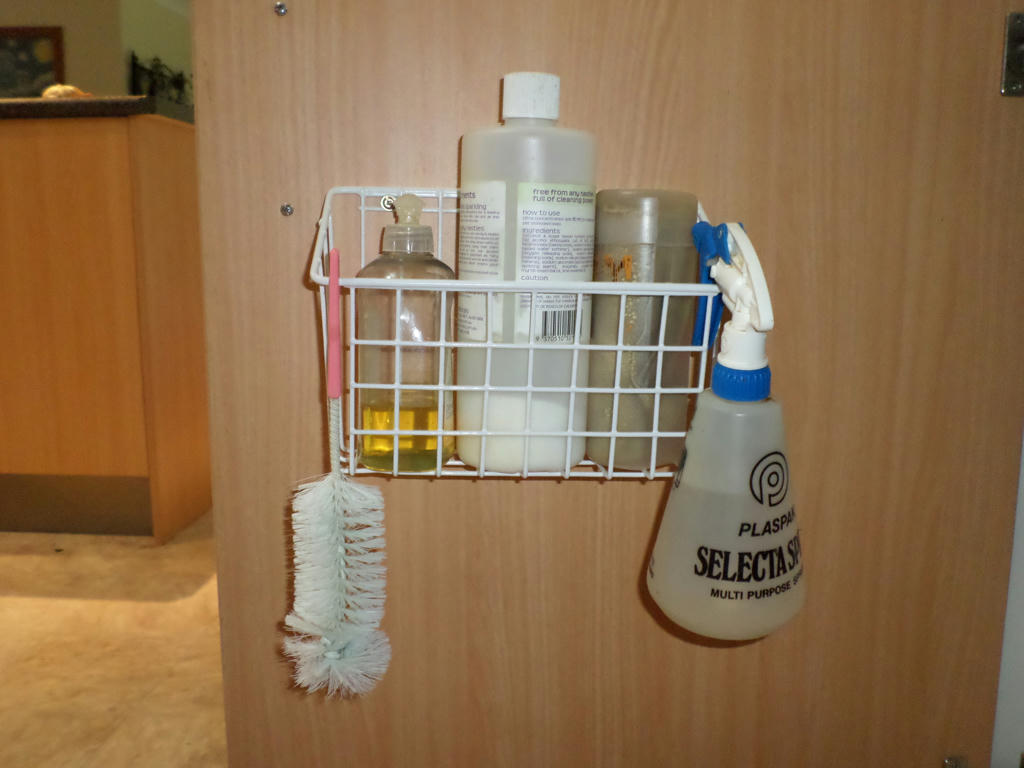
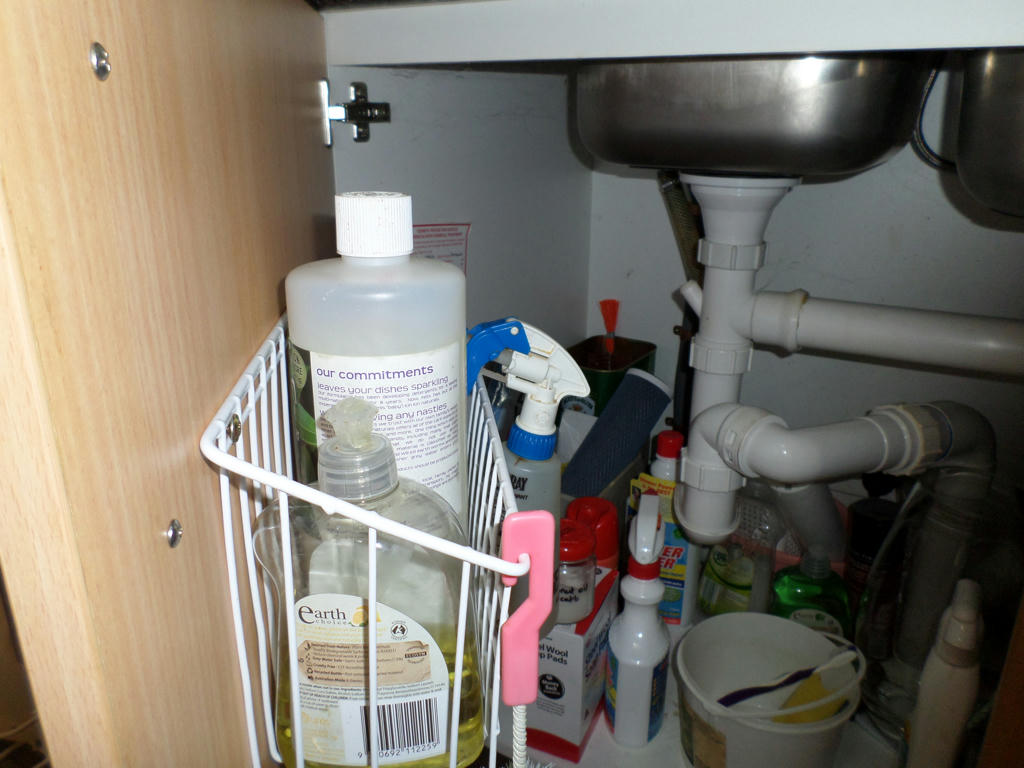
Finally, to the last, and what I consider the most successful vertical space, installed in the kitchen. It's a a wire basket, under the washing-up sink. It's purpose is to hold cleaning items, I use the most.

It has saved my back, bending down to the lower shelf, for items only required a few minutes. While only such a short duration, things like the "Miracle Spray", for example, were retrieved multiple times a day! So consider using vertical space, where it can help save your back, with repetitious tasks.


January 2019
Sink, cabinet ~ new addition


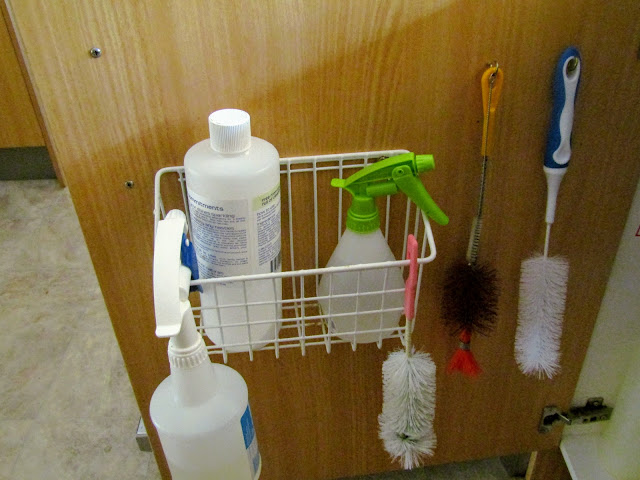
It's success, warranted expansion. Bottle brushes! If you make kombucha at home, or use glass bottles to store water in the fridge - even using narrow reusable straws, then you'll be familiar with the necessity of a brush collection.

Not having to bend down at the back of the kitchen sink, any more, meant I was suddenly washing the bottles, as soon as they migrated to the counter. It's one of those things I SHOULD have made more easily accessible. Because in hindsight, I realise this is why my kitchen counter, often looked like a bottle recycling centre - and not in a good way!

It's also why, I would try and stick my hand into narrow jars - attempting to get the dishcloth, to the bottom. Now it's become a habit to grab the bottle brushes from the door, whenever I need them at the sink. There are so many more things I wash with the brushes now, because they're so easily accessible.


January 2019
Sink cabinet door


I'm not finished with this particular door, just yet. On the opposite side, is a convenient place for my knitted dishcloths, to dry. Originally purchased at a cheapy-store (Dollar-store, for the US) it's one of the easiest ways to create vertical space. Just by hanging it over the door. Removable. Portable. No adhesive strips. Nor drills.

It may sound silly, but having a dedicated place to hang your dishcloth, is a big deal. Formerly, I'd use the tap spout, or dish drying-rack. Which wasn't always convenient, with a really stacked load of dishes. Sometimes migrating it to the tap, wasn't a good idea either. Especially if you're in the middle of cooking dinner, and need to rinse something in the sink. It threatened to fall in the food, every time!

Now I don't worry about homeless, wet cloths, getting in the way.


January 2019
Sink, cabinet ~ new addition


Cleaning under the sink recently, I decided to move more items out, and onto the adjoining door. The fly squat (mandatory in summer) and BBQ lighter, take such little space, but often their requirement, is a case of urgency.

The BBQ lighter comes in handy, after a power outage. Finding the means to light candles in the dark, is challenging. Likewise, who wants to break eye-contact with an annoying fly, to retrieve the squatter? Both can be very frustrating situations. Now dealt with, by quick retrieval. I've kept this area, intentionally sparse. Like the fire blanket above. All to facilitate the need for an urgent, automatic, response.

This was actually the cabinet door, I considered hanging the fire blanket from.


January 2019
Sink cabinet ~ underutilised, space


Of all the cabinets in the kitchen - it's under the sink which was, most forgiving to vertical storage on doors. There's plenty of wasted space, under a sink. Just ensure, anything you plan to attach to the doors, has enough clearance around the plumbing, first. Otherwise, you may find the doors won't close afterwards.

Unlike an appliances cabinet, or saucepan cupboard; where bulky stockpots have nowhere else to go - don't plan to utilise those cabinet doors, for vertical space. Multiple, bulky items, need all the space you can give them! So keep that in mind, when contemplating which cabinet doors, to use vertical space on. Some cabinet doors, will seem endless, others, are best leaving to maximise cabinet space.

Even though we don't live in a tiny house, we're nonetheless stacking functions with the storage available. So space, is still a premium consideration. What I like about the improvements thus far, is how it all cost under $50. Plus, I still have spare hooks to use when I find a purpose. And there's always a purpose!

I look forward to sharing more vertical space solutions, in future.


Monday, February 6, 2017

Colour project

I was inspired recently, to brighten up a few areas in our home. We have a blank canvas with slightly off-white, walls. I've never been one for bright colours in large quantities, but am partial to splashes of colour in the right place.

They're referred to as accents, and that was the focus of my room makeover. This post is not about the entire room - just a particular aspect I'm adding to it. I needed something to fit a narrow section of wall. So what about a simple picture?


Click image to enlarge


I went through my framing supplies, and discovered a picture either my mum found, (or I did) at a second-hand shop. It had $3 written on the back. It doesn't have any glass, and the frame isn't designed to include glass anyway. It would suffice for the project I had in mind.

But I needed to change a few things about it first...


Two pieces


I needed to paint both the frame and the backing board, white. For reasons, which will become clearer, later. The little metal latches at the back, simply pulled back with a butter knife, allowing me to remove the backing board entirely. Goodbye - "afternoon at the beach", and hello to...um...something new.


Tools


Newspaper was mandatory, as a splash cover on the bench. I could get as messy as I liked, without worrying about it. The tools were simple. A paintbrush, a roller and a flat-head screwdriver.

That roller has been with me for well over a decade. It helped paint some of our former house, before this one. It's great for getting around tight spaces, where a big roller would just be too cumbersome. Only I discovered recently, the foam roller had disintegrated. Fortunately, a trip to my hardware store, found replacement foam rollers - much to my delight! I love that little roller and glad to have it back in action.


White paint?


The flat-head screwdriver, was for lifting the lid off an ancient can of paint. It's lasted many years. But it was in a poor state, when I finally broke through the rusted seal. It was more like putty, than paint. There was a rubbery skin on the top I had to break through too, but inside I found a workable medium.

I scooped what I needed into a spare glass jar, added water, and stirred well!


First coat


The paint went on smoothly, if only a little thinner. The first coat went on but actually took four coats, in total. And two of those were white gesso from my art supplies cupboard. It's thicker and has more tooth for paint to grip on.

But I had my background and frame done within the day. Which allowed me to move onto the next step:


Taping over

I wanted something very simple in this room. The feature was going to be the colour, not so much what the image was meant to represent. So I took some masking tap, and put it down on the board, to cover the areas I wanted to stay white.

I found a picture online, of a Monstera deliciosa, or fruit salad plant. I used it as inspiration (you can see it in the background) for my taped experiment.


Ready to roll


Once I was happy with the design, I poured the paint into my rolling pan. Isn't it a beautiful colour? It's called Cool Aloe, and is from the Accent range at Mitre 10. I've used this colour elsewhere in the same room, and I needed to carry some of it over to a different wall - hence the picture idea. This is a sample pot, so very inexpensive - under $10


First coat


Then it was just a matter of rolling the colour, over the board. I needed two coats, with two hours for the coat to dry in between. Luckily, I had a busy day that day, or I would have been highly impatient, to start removing that masking tape!


Partial reveal


The tape did it's job well. Almost too well. It was a little challenging to pull some of it away. To get the shapes I did, I had to tear the tape and place it on, several layers think. I wanted that ragged edge look, which I achieved, but it was a little fidgety to get it all off.

Then it was just a matter of fitting new hooks to the picture frame, so I could hang it portrait style - instead of landscape.


Done and hung


It fitted perfectly, into that narrow space on the wall. I didn't mind how it looked rustic or imperfect either. That was the whole point. It was introducing colour, more than it was introducing shapes. It made the plain walls a little more interesting to look at.

For this project, I paid under $10 for the paint, and replacement foam rollers. The room I'm doing up, also has other equally, inexpensive updates. I wanted a change after 10 years of blank canvas walls, and this was fun to create. It also used up supplies I had in storage and put them to good use.

I look forward to doing a full room reveal in the near future.

Saturday, February 4, 2017

Rustic bench

One of the projects I completed recently, came about, when we had to clear everything off the verandah. You'll see what hoarders we were, when I eventually share the adventure of the verandah project.

Needless to say, we threw away a lot of junk we hoped we could turn into something else. When it starts rotting on your verandah though, it's a good sign you're never going to use it. One such item, almost made it to the dump.


That long piece of tree trunk, had been individually shaped, and someone attempted to paint a picture on the other side. It was faded beyond recognition now. I was going to make a "Gully Grove" sign out of it, but it just didn't happen.

Another item to go to the tip though, was my old washing basket trolley. You know the ones, which roll your wet clothes to the line? Well the dodgy wheels had fallen off, years before. It sat at the clothes line though, to receive my basket of washing instead. It really helped my back, not having to bend down to the ground, all the time.


With the trolley in the trailer to go to the tip, I decided I had to come up with an alternative bench. My mum gave me that piece of wood, years ago. Also those stumps of wood underneath. She had one of her trees cut down and didn't have a fireplace. Neither did we. So we used the short logs instead, as individual seats near the front door. A place to hold bags as you attempted to get the keys for the door. Well, everything just had to come off the verandah though!

Like a lego master-builder, knee deep in junk, it just all clicked in my head. Those pieces would soon make my new rustic bench, at the clothes line.


Only the wood wouldn't last long, out in the sun, without a coat of linseed oil. I like to use raw linseed oil, to help preserve the wood. It adds moisture, so it doesn't dry out too much, or soak in too much moisture in the rain.

That's one of my children's, damaged baby singlets too. Very rudimentary tools, for a very rustic project. I didn't have to purchase anything for this. It was already here - including the linseed oil.


The wood was very thirsty, so I just poured the linseed oil, directly onto the surface. I did this several times, as the wood just soaked it up like a sponge. It hadn't seen any kind of moisture for a while. In the middle of summer too, it was bound to be dry.


Then it was just a matter of gently rubbing it all in, with the cloth. I found this part of the process, extremely enjoyable. How can I describe something as tactile, as oil and wood - and the gentle rhythms of massaging it back to life? I had no idea how beautiful it would look afterwards.


The grain just glowed back at me, and signed. I sighed too. Did I already say, how enjoyable this process was? That old piece of wood, destined for the tip, had rekindled some divine quality it didn't have before. But for a bit of TLC, and a new purpose, it came back to life.


Before


 After


I've already used it to hold my laundry basket. It's much more sturdy, than the rickety trolley with missing wheels. I've also used it as a seat. Perhaps a little short for that purpose, but perfect for little people. I discovered Peter crushing some sort of plant on it already. The perfect work space!

So projects don't have to cost a lot of money. Sometimes it just requires looking at what you've already got. I found when I made myself choose an item's worth, with threats to go to the tip, I suddenly found a practical use for it. All those years I took it for granted, collecting dust on our verandah, while the rocking trolley was falling apart.

Now I love my new rustic bench, and the process of bringing it back to life.


Thursday, February 2, 2017

Owl

So as I was doing my Kitchen room Blitz recently, I found a cherished item on top of the refrigerator. It's something which means a lot to me, because my daughter made it at school. She gave it to me for Mother's Day, the same year her brother was born.


 Owl


Naturally, I've wanted to put it on display, but it had an awkward shaped bottom, so prone to falling over when leant against something. I didn't want to glue any eyelets on it, for hanging, in case it fell down and broke. So Owl sat on top of the refrigerator, constantly being righted, and sometimes not.

When I did my weekend project, back in July 2015, gluing up our dinning chairs, I realised you can buy, super strong epoxy glues, which holds up to 150kgs. My recent project blitz, got me thinking about that glue again. I kept it capped, and tucked away in the laundry closet.


Bibs & Bobs


Which is the original tube, in the image above - along, with some of those bibs and bobs, I was telling you about being purchased from the hardware store. Owl was not going to sit on the fridge any more. Owl was going to defy gravity, like all birds of prey, should.

One of those triangle hooks would do the job, and I planned to use the other two, for another project I have on the go (I'll share another time).


Placement (without glue)


Owl was made of modelling clay, which was also varnished. Fortunately, not completely on the back. The centre was clean and dry to apply the glue. I positioned the triangle, to see where I wanted it to be placed. Then it was a matter of mixing the epoxy glues (according to the instructions) and applying it to the clay, and metal.

Reading the instructions on the glue, it could adhere both those materials. Always check the selected glue is appropriate for what you want to join.


Glued & taped


Because this was not an instant glue, it needed an hour to start solidifying. I wasn't going to stand that long, holding the metal tab down. So I found some electrical tape, to do the job for me.

It worked really well too. I didn't remove the tape for a whole day, which is the duration needed, for maximum bonding capacity. I could have removed it after two hours, but I wanted to wait the whole 24. I wanted Owl to stay in place, after all.


Boo!


With the help of my new cordless drill, I attached a screw into the dividing wall, between the kitchen and lounge room. Owl is now hanging beside the fridge, and right at eye level, for maximum adoration.

I love Owl, and it's one of those projects I was immensely satisfied, upon completion. Because I've always wanted to do something special with my daughter's creation of love. Now I have. It was worth the spare change I spent on parts, to do it. Sometimes you've just got to commit to doing those little things, which always seem to be put off.

So if you need to, write a list of small projects you can realistically achieve on a weekend. You'll be surprised by what you already have around, which can be used. You probably don't need to buy much at all - if anything. Which is the the theme of the next project I intend to share.


Friday, June 17, 2016

Weekend projects inside

It's been a while, since I've done a weekend project update. These are jobs which can reasonably be done in a weekend. The last time I updated, it was all about storage solutions for my kitchen. I promised to update what I did for the bathrooms at the time. I'm now fulfilling that promise, some eleven months later!

Personally, I love storage solutions which can be built using recyclable materials. However, not all spaces are created equal either. Sometimes, you have to purchase something which is designed to fit the limitations of the space. Such was the dilemma, in our small ensuite.


Former storage solution


Where to hang towel rails, when wall space is a premium? We managed to erect a permanent towel rail, above the toilet, which kept it high and dry. The second towel rail however, involved purchasing a free-standing unit, with lower shelf. While it successfully aired the towel enough to dry, it was awfully close to the floor too.

The free-standing unit, inevitably became a haven for dust bunnies, because it wasn't so easy to pull out of its nook, in such a confined space. I always thought the shower wall, would make a perfect spot for a second towel rail. But I wasn't thrilled at the idea of drilling through glass to install one! I eventually got my wish, without having to involve power tools.


New look


Getting the towel rail up higher, not only prevented the dust bunnies, but it also made the space much larger. Our free-standing towel rail, went into the adjoining bedroom instead, to air clothes worthy of another day's wear. We could also store our slippers on the lower shelf.


Holds well


What made this possible without drilling through the glass however, was a new product using strong, silicon suckers. Forget all the other products you've seen, which inevitably lose contact with the wall. These ones are designed to hold up to 15kg in weight. More than adequate for a slightly damp towel.

These towel rails are about 80cms long, which was perfect for this space. It serves ordinary bath towels well, but may not be suitable for the much larger bath sheets though.

Also in our ensuite, and the main bathroom, is a matter of counter space at the sink. This has been solved by moving the toothbrush console, into the cabinet, under the sink. This was from the same suction cup, product range.


Suction cup


Start by cleaning the surface, allowing it to dry, and then applying the suction cup, according to the instructions. These will be included in your product, but I'll show a video down the bottom too.


Cup holder


Next, sit the metal cup holder into the lip and gently pull down, until it clicks into place.


Final assembly


Then sit the plastic cup into the holder. Be sure to check where you position the product, that it allows the cupboard to open and close freely. Some bathroom cabinets, have an upper lip you have to take into consideration.


Ready to use


Then fill with your favourite toothbrushes and paste. We still store a lot of stuff on the bathroom sink, but getting the toothbrushes into the cabinet, also meant they were protected by a lot of things which naturally float around the bathroom. Think, stubble and random hairs.

There was also one more product I purchased, which I wanted to try out in the main bathroom.


Off the ground


The single toilet roll holder, is screwed into place, but the multiple holder, is our new addition. We've always kept extra toilet rolls at floor level, for some reason. Probably because it's where the major storage solutions, focus on keeping them.

If you're anything like me though, you hate having to move the extra toilet rolls out of the way, to sweep and mop. They inevitably collect dust bunnies on them too. I wanted a solution that would lift the toilet rolls off the ground, where all the dust seems to collect.

This new holder (also utilising he same suction cups) has been working really well, and I haven't regretted purchasing these various items for our bathrooms. It's been almost a year now. In the interests of DIY though, I also wanted to include some other solutions in this post, in case it may suit instead. Especially if it uses existing features.


If you want to use your existing toilet roll holder, you can make a pouch in this tutorial, or come up with something of your own design. The only thing you'd have to take into consideration, is your holder is long enough to accommodate a roll, plus the ribbon on either side.

Or visit this link, for some more ideas on toilet roll holders and extra storage.

Now for the video I promised. It's like an infomercial, so skip it, unless you're genuinely interested.


I purchased this particular Everloc range, online, from Lifespace, and I notice they have a sale on their limited quantities of large towel rails, right now. Just look under "Bathroom", and then, "Towel bars and racks". I'm not affiliated with the company, I just thought I'd mention the sale if anyone was interested.

Howards storage world, is also selling them online, slightly more expensively, but they seem to be advertising a 10% store wide discount too. You can also find them in-store at Target and Bunnings. Non affiliate recommendation too.

Is there a clever bathroom storage solution, you've had to come up with, for your particular space?


Sunday, July 26, 2015

Weekend projects inside

I'm late in updating my latest weekend project, namely because I decided to give the computer a rest for a while. The outdoors was calling and we had the time to indulge, so everything else got put on hold. I look forward to sharing some gardening endeavours, but for now its back to my weekend projects.

This was something I had been mulling over for a while. There's a lot of things I do on a daily basis, which wasn't organised very well. We currently live in the biggest house we've ever had (at four bedrooms) but its not a Mac Mansion. It doesn't mean the space we did have available however, was organised very well.

So I did a lot of online research, and borrowed a few ideas. Let me start with what I did in the kitchen.


All in a row


I bought some clear "Command" adhesive hooks, which can hold up to 225g. I did a dummy-run, measuring out the distance between each hook, to give enough room for each cup measure, and for the measuring spoons. I'm happy to say, the hooks have stayed in place, even though this cupboard gets opened a lot.


Functional storage


It's my baking cupboard, and the measuring cups and spoons once sat on top of the plastic container, with the blue lid. I used to have to open the door, stick my hand in and hope to grab the cups or the spoons (whichever I wanted) and drag the whole lot out. Now I just open the door and select which ones. No guesswork involved, because I can see exactly what I want.


Stored, but not conveniently


Also in the kitchen, I had a problem with extremely difficult to store saucepan lids, which were constantly pushed around the frying pan drawer. An obstacle they are no more, thanks to a simple tea-towel railing.


 Vertical space


These are now stored in the cupboard door, under the stove top. I did have to screw into the thin wood, as opposed to attaching by adhesive tape, but I don't imagine I'll be needing to remove this railing. I did a dummy-run with measurements again, being sure to take into account, the shelf in the cupboard and the lip at the very top. I also had to reorganise a few items in the cupboard, to make sure the railing didn't hit them, once the door was closed.


 Bottles of bliss - if stored correctly


This would have to be my favourite addition to my kitchen storage campaign however - a simple wire basket caddy. I use the vinegar spray, dishwashing liquid and powder for the dishwasher, regularly during the day. I also use the bottle cleaner quite a lot also, but had nowhere "airy" enough to store it.


Ready to go!


Once again, I used screws to attach the caddy to the door, did a dummy-run, and made sure I could position it, so it filled the space between the door and the plumbing. Who needs that space right where all that s-bend plumbing is anyway,  except maybe for storing regularly used cleaning products?

The reason this is my favourite addition to the kitchen, is I no longer have to bend down to the lower shelf on multiple occasions during the day. I get to stand up straight, open the door and grab exactly what I want. I highly recommend this for people with mobility issues or back pain. I have a reasonably healthy back, yet I didn't realise what a relief it would be, not to have to bend down to that lower shelf for items I use every day. I can't believe I haven't done this one sooner.


More hooks


Lastly, for the kitchen, is some more (can you guess) adhesive hooks. Only these metal hooks swivel. They're meant for hanging utensils, but I already use  an old pottery crock for that purpose. Who needs to have their oven mitts, taking up storage on the kitchen counter though, as mine previously were?


Tucked away, in the right space


My oven mitts are well loved, and now hung inside the pantry door. I didn't want them in the cupboards near the stove-top and oven, for safety reasons. The storage space it freed, was the heavy pot holder (trivet) they were formerly resting on the counter. I had to move the mitts first, then move the pot holder into position, before I could get to whatever needed removing from the oven or stove.

It may sound like a lot of trouble to go to for oven mitts and a trivet, but as a former professional baker and cake decorator, organisation is the key to any regularly used work space. If you have to double-handle things, when you're in the process of cooking, mistakes are easily made, things get dropped - it's just one of those days - or just too many stacked functions in the one space, with poor organisation? The simpler you can make your tasks, the more likely they are to run smoothly.


More organised - less drama


Right next to the kitchen however, is a storage cupboard. Its chock-full of stuff. So much so, that I would often have to battle with the vacuum cleaner, to get access to the broom and dustpan. I use them more than the vacuum, (daily almost) but I suddenly noticed all that space on the door! Why was I wrestling with the vacuum cleaner hoses for?


On a shoestring


This was another case of looking up, instead of down. I just had to drill a hole in the broom handle, tie a random shoelace through it (keeping an extra shoelace, when one of them breaks, is handy) and hung it from the hook.

This was the same brand of adhesive hook I used for the measuring cups and oven mitts, only it could hold up to 5 kilograms of weight. Even though my dustpan and broom, would come nowhere near that - I also had to take into account, the extra weight the item would pull on the hooks, when the door is swung open. To date, everything has stayed in place.

If my cupboards were made of solid wood, I would have preferred screw-in, metal hooks. You can even get fancy, and make hooks out of all sorts of things. Whatever system works best for you, so don't feel like you're only limited to pre-made storage solutions.

I also made some storage changes to the bathrooms, as well, which I'll share another time.

Are there changes you made to your kitchen work spaces, where you thought, why didn't I do this sooner?