Showing posts with label Incubating eggs. Show all posts

Wednesday, November 1, 2017

What goes around...

I have been lamenting some brush-turkey damage in the garden recently. Especially when it had been so dry. Watering any plant, was an invitation for them to scratch it up. Because water, brings life to the soil. They're not silly, those turkeys. They gotta eat, and my garden is a good buffet, when times are lean elsewhere.

More recently, we discovered a new ritual they were up to...


Click to enlarge ~ scratching up hill


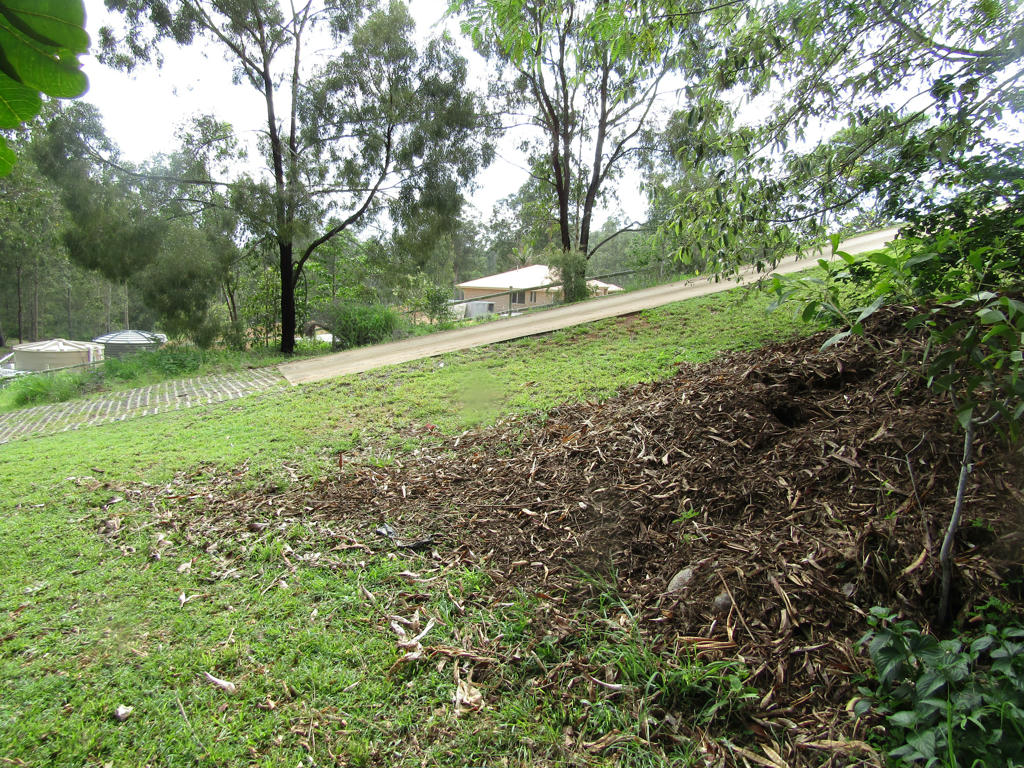
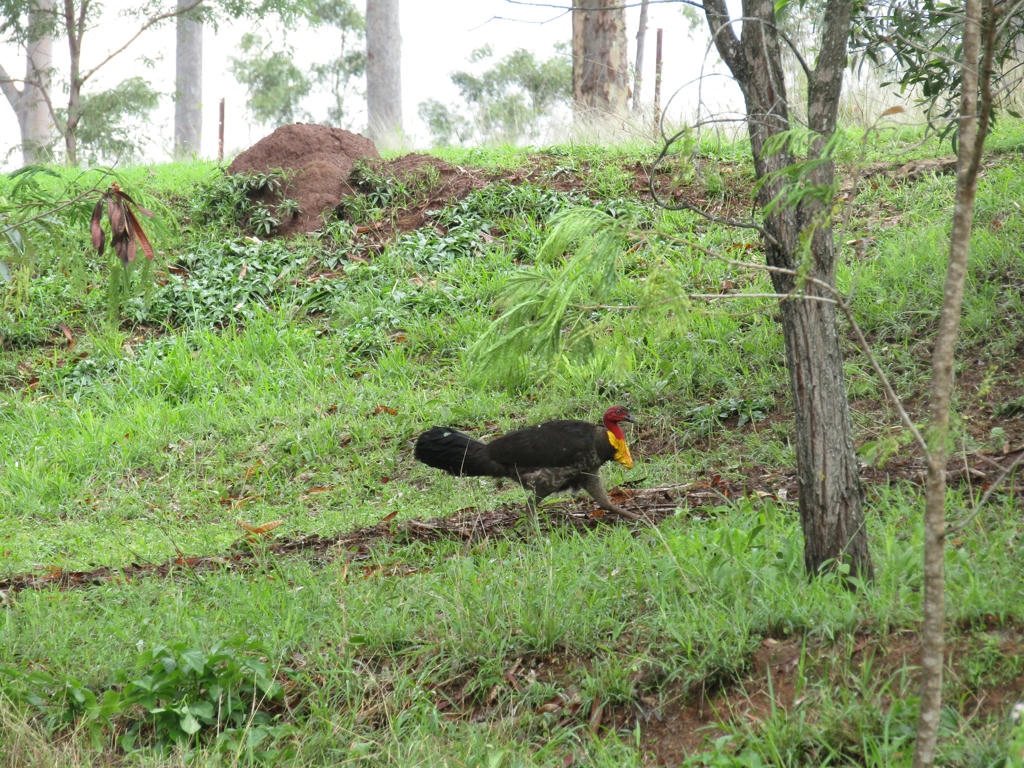
Mr Turkey was building a nest. He started a line of scratching, where there was leaf mulch to be had (under the trees). He patiently worked his way, up and down, scratching the mulch back to the nest. It was incredibly funny, once he reached the canopy of the trees again - because he'd immediately race back to the nest, like a hungry velociraptor on steroids!

By golly, they look hilarious when they run!

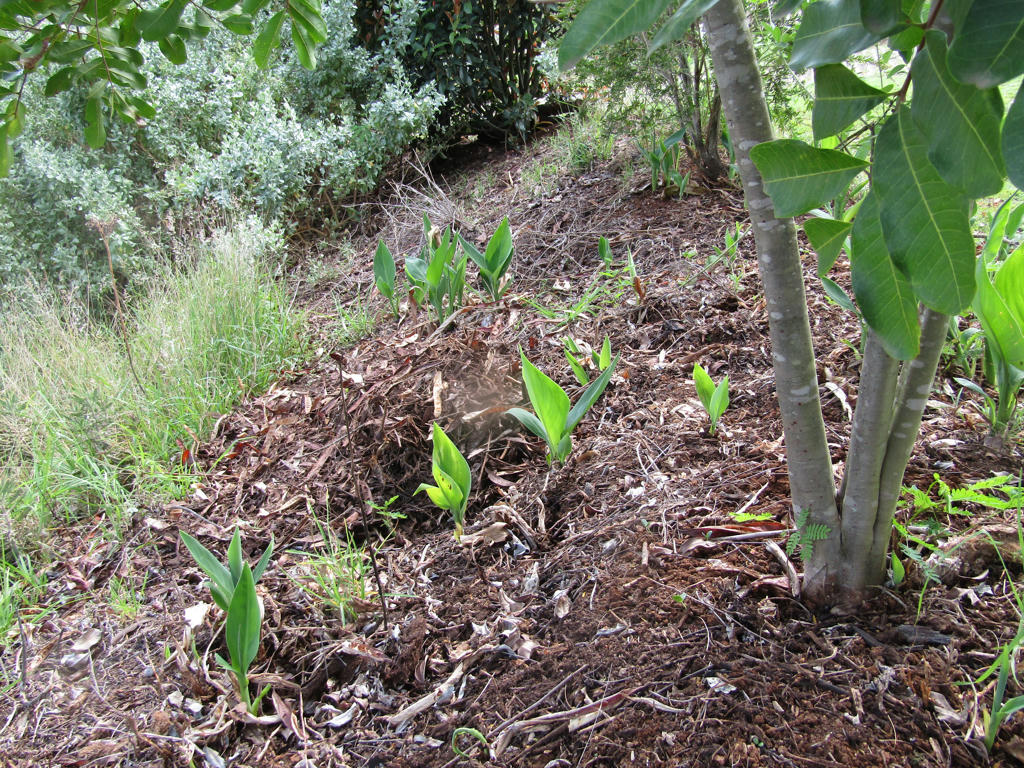
I was lamenting my garden again, when Mr Turkey cleaned-out the leaf mulch under the trees. Because it was my nearby garden bed, he turned to next!


 Denuded of mulch


Luckily the rain had been around, so I wasn't worried about the soil drying out, after he made off with the mulch. But I had to observe carefully too. If the sun decided to come out, for a long stretch, I'd have to get something else to cover that bed. I really didn't want my plants to be set-back, after the rain had finally hydrated the soil again.


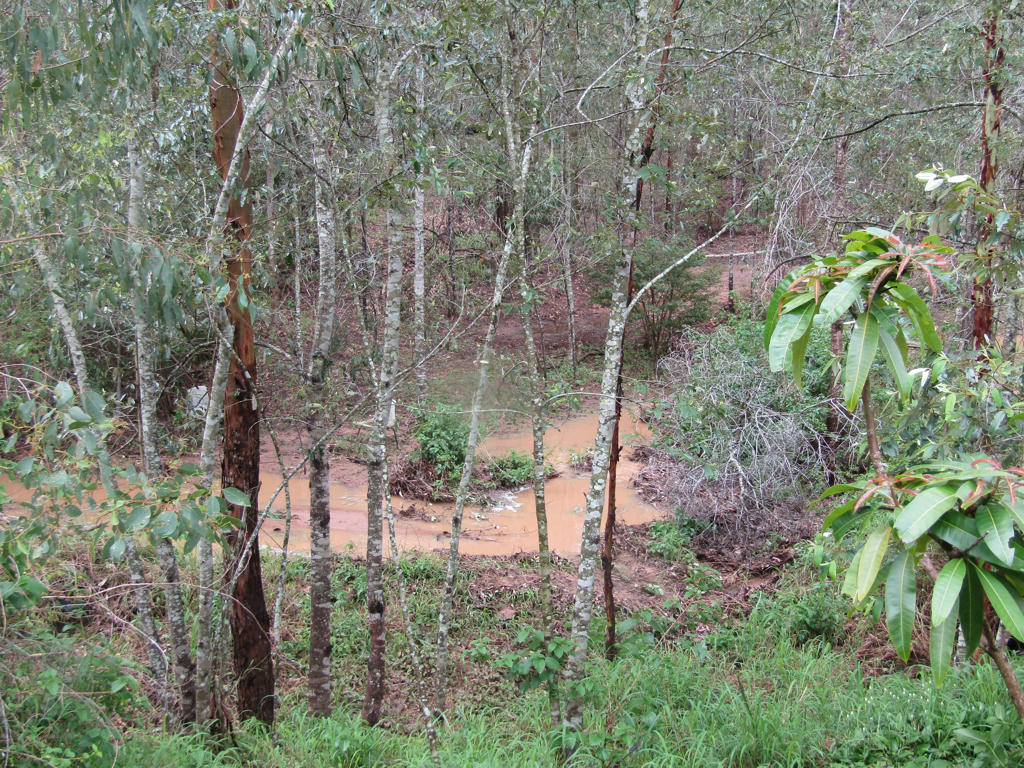
 Flooded gully


The rainy weather, ensured I never had to deal with re-mulching for the short term. And Mr Turkey, was certainly a dedicated father, flying over the flooded gully to reach the nest every day. He wanted to add more mulch, to keep the eggs in the nest, dry.

As much as I didn't want him pilfering mulch from my plants, I had to admire his tenacity, to bring another generation of chicks into the fold. I was quietly cheering him on. Crazy, I know! Why would we want more brush turkeys, feasting from our garden.


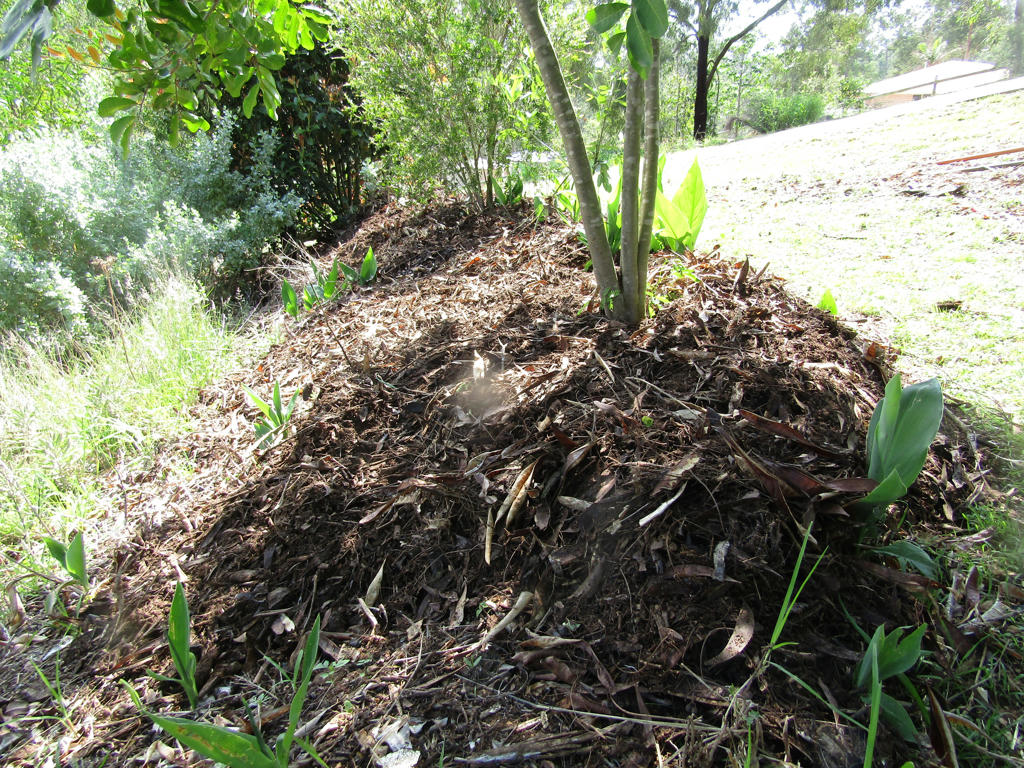
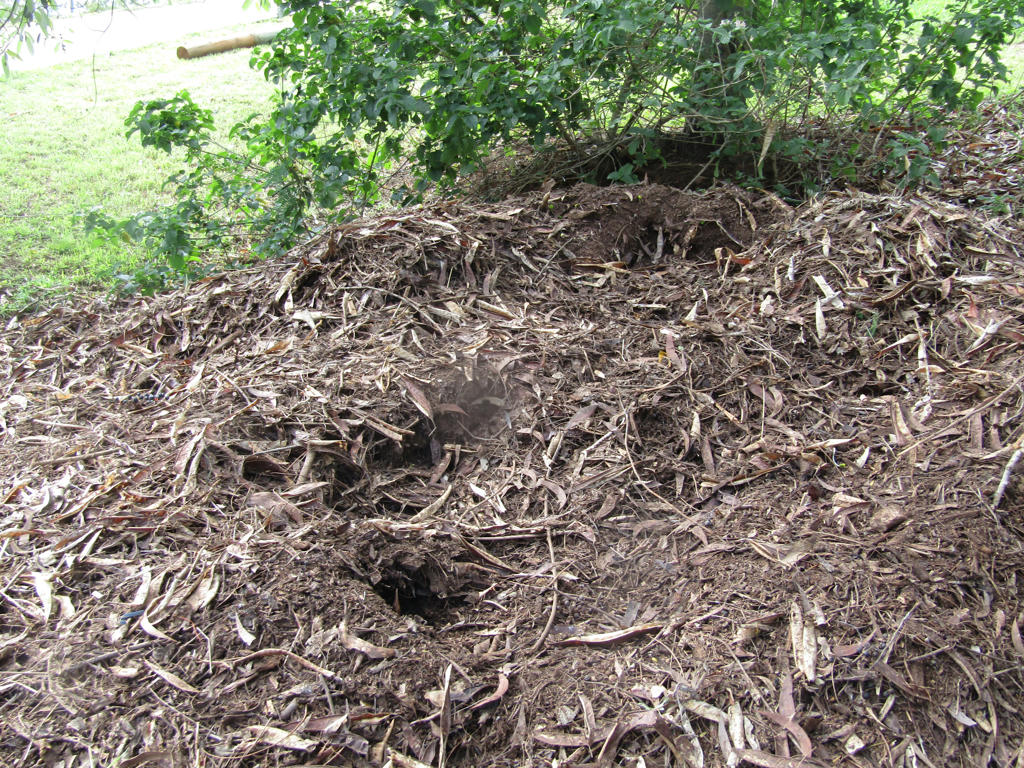
No longer a mound of leaf litter


Then, one day Mr Turkey didn't return to the nest. Maybe he'd done all he possibly could, and now it was the waiting game for his chicks to emerge? The baby chicks must fend for themselves, once they emerge from the nest. Dad is long gone, by then - and mum left, once she laid the eggs.

When I found holes in the nest, I thought - maybe they had emerged? But something didn't seem quite right. Why had so much mulch been displaced?


Mulch everywhere?


Mr Turkey, always kept a clean operation. We were amazed how neat that pile of mulch, was. It appeared, something else had interfered with the nest. There should have been one hole the chicks emerged from, not three that we found. Nor should there have been mulch strewn everywhere.

It could only be one thing - a goanna must have raided the nest. We get plenty of those around here. Especially at this time of year, when birds are laying.


He worked hard


Sorry, Mr Turkey. You availed much, but you were robbed in the end. I know how that feels. But I get why you're doing it. You've got to live somewhere, and pick the best place you can, to set up the next generation. You're making a living, like the rest of us. I don't begrudge you that. And our garden is pretty cool. No wonder you like hanging out here, so much.

Once I spared a moment, for Mr Turkey's loss, my attention turned to something else...


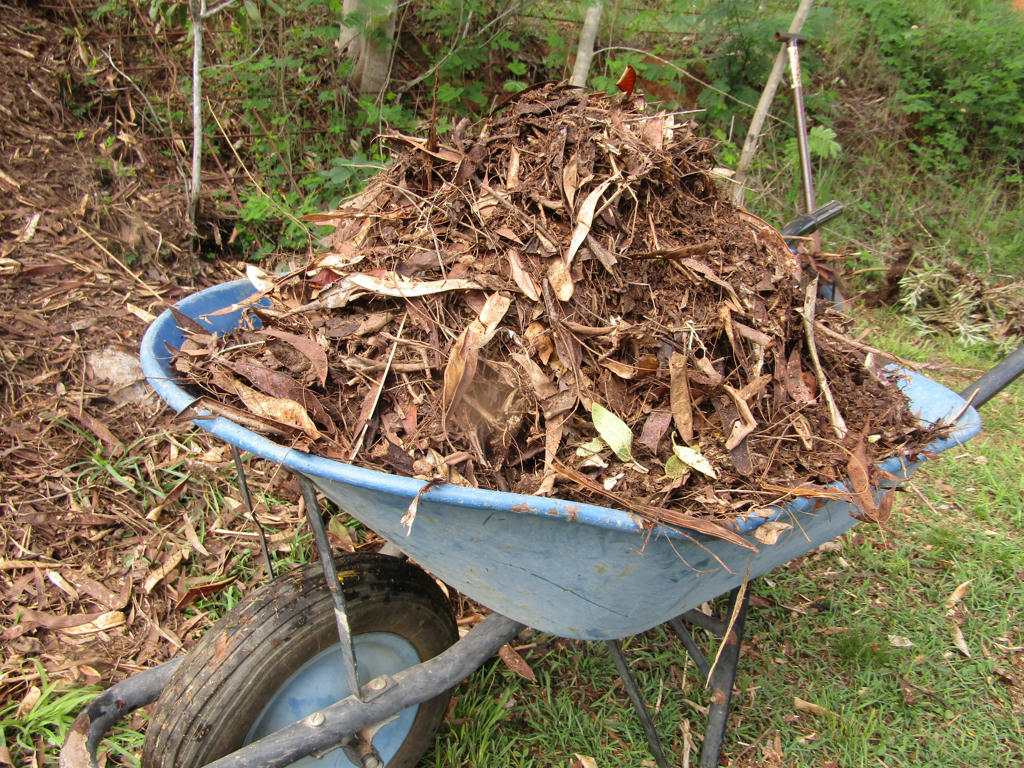
Organic bounty


The rain had stopped, and the sun made a more regular appearance. I needed to cover my garden bed again. Mulch! What goes around, does indeed, come back around.

Not only did I have the few remains of the wood chips we dumped there - which Mr Turkey saw as an opportunity for a nest, but I also had all this new leaf mulch too.


Phew!


My beds have been re-mulched again, preserving the moisture all that rain left behind. With summer around the corner, I'm relieved for that. And no doubt, Mr and Mrs Turkey will be finding another suitable location for a new nest.

I saw them in the yard, just yesterday, checking out real estate, under the mulberry tree. I gave them a warning chase, but only because they were a little too close to my vegetable beds. They're not threatened by me at all, because they're always back, a minute later!


March 2016


I wonder if one of these nesting Brush Turkey's, is the one, old Matriarch hen adopted in March 2016? Old Matriarch has now passed on, but the brush turkeys, remain in our landscape. And no doubt, will, for a long time to come.


Growing, brush turkey chick, April 2016


 November 2017 - the resemblance is uncanny

 
What goes around, comes around - whether it be seizing organic mulch, adopting baby brush turkeys, or tolerating the grown ones in our garden. I guess even Mr Goanna has to make a living too. And his offspring, will be (ironically) preyed upon by the carnivorous birds in our location.

There's still plenty of time in spring, to build another turkey nest. And if I know anything about the brush turkey's in this area, they're as tenacious, as the landscape is challenging. They'll be back...and so will their kids! That's how it's meant to be.

Saturday, August 27, 2016

Spring chickens

The last few days have been hectic. The kind of hectic you plan for and anticipate, but you never know what it's going to be like, until the actual day arrives.

For the past 21 days, I set some 20 chicken eggs, in our incubator. I forgot to turn the eggs, once, in the first week. You're supposed to turn them twice a day. Plus I had a temperature fluctuation, a few days in. It dropped by a few degrees, overnight. So I didn't even know if we were going to get any chicks at all.

Then on day 20, at precisely midday, our first egg hatched...


Egg #1


I wanted to check which eggs were viable, as we had a new rooster on the job. So I numbered all the eggs from one to twenty, as I collected them. Since they were only laying 3-4 eggs a day, it took several days to collect enough. Number one, was in the first group to be collected, so it was one of the oldest eggs. Can you guess which one hatched first? Yes, it was "1" and thus, we are naming them, number one.

Our eldest has taken a liking to them in particular, because they are both the first born in their family!


Drying


This is still number one, only a few more hours older. They're wet when first born, and once their down dries, they look like little fluff balls.  Although the humidity in the incubator meant, their down didn't get completely dry yet.

The next egg to hatch however, was number eight.


Egg #8


Eight, came much later on day 20. Like, eight hours later at 8pm. Number eight, eight hours later, at eight PM! You will find many of the numbers have bizarre placements as we go along. But we worried initially, that the first chick would be a lone survivor. Because although several other eggs had pipped (meaning the chicks had broken the egg with their egg tooth) nothing much had happened for eight, excruciating hours!

Number eight, looks just like the first chick, only it has a dark coloured beak. As they are both yellow, they will both grow in white feathers. We're dealing with Isa Brown, crossed with a Leghorn rooster, who is also part Isa Brown. So the colours are all going to be very different!

The third, and last to be born on day 20, was number 16. They hatched just 45 minutes after the last, and at that point, we didn't known how many more would hatch the next day. Twenty-one days, is the final day. Anything after that, won't likely hatch or won't likely survive, if they do. As they tend to be too weak.


New arrivals, from eggs #15, #17 and #19


Sometime overnight however, three more hatched. The three up front (to the right) were the day 20 hatchlings. The single one to the left, and the two at the back, were the new arrivals. You can see, some more eggs had pipped, but we still didn't know what day 21 would bring. Sometimes nature doesn't always deliver, and the chicks simply die in their shells.

The next two eggs to hatch, virtually happened at the same time.


Egg #2


Number two hatched at 6.30am. We didn't see the other chicks hatch (we were alerted by their peeping instead) but it was amazing to see the chicks slowly emerge from their shells.

Nearly at the same time, number four, hatched...So number 2 and four, were 7th and 8th to hatch. We think of them, as the twins.


Egg #4


At this point, we were very happy with the outcome. Eight chicks, wasn't a bad turnaround, for something I wasn't sure would even succeed. But there were still more surprises to come.

Number fourteen, arrived at 6.45am, and a half hour later (at 7.15am) number ten made it! What is so funny about number ten is, their placement in the que.


Egg #10


Just as number one, came first - number ten, came tenth! Dab smack in the middle of 20 eggs, number ten, hatched tenth. I was glad in the fact, I decided to number them, as I collected their eggs from the nest. It made hatching all the more interesting!

Something bad happened after 10 though. My son got a hold of our camera. I normally kept it well out of reach, but I left it in the laundry to take pictures, as the chicks emerged. It just so happened, he dropped my camera after number 10 was born, and cracked something inside. It no longer works.

So the next photos, I took with the camera in my smart phone. Which happened to be after I relocated all the chicks, from out of the incubator and into the brooder.


Recovering in the brooder


We got quite a variety of colours in the end. Even some with racing stripes! That was egg number 20, and born eleventh. This racing stripe however, is indicative of a brown leghorn. We were never told which coloured leghorn, fathered our working rooster, but there was a chick born with feathers on it's legs too. So there's definitely more in the mix, than anyone knows.

In the end, we got 15 chicks out of 20 eggs. There was only one casualty. Number eighteen (born thirteen) made a lot of noise after they hatched. Plus they couldn't stand up initially. They kept flipping onto their back, with their feet in the air. I eventually assessed they had crooked neck, indicative of their inability to keep their head up, and a small lump on top of their head.

If you want to read about crooked neck, you can do so, here. It's most likely genetic, and it means part of the brain has been injured.


The brood


Luckily, I have successfully treated something similar before, and thus far, the chick has shown some improvement. They have more control over their neck, and can get about to eat and drink. You can see them in the picture above (bottom, centre) with a little red bump, poking through the top of their yellow down.


Egg #18, aptly named "Mumble" from the movie:
Happy Feet


I had to sprinkle some antiseptic power on top of that bump, to help disguise it. As the chicks kept pecking at it. That's how chicks learn to eat - by noticing things which stand out. They instinctively go over and peck at it.

We will have to watch and see how Mumble goes. They have been accepted by the group and hasn't been pecked at, since applying the powder. Which is a good sign. They all had their first day out on the grass already, and loved to sleep in the sunshine. Most of the time however, they stay in the heated brooder, as they can't regulate their body temperature yet.

Now we have to repatriate a chicken tractor for outside, since we totalled the last one. I can't believe it's taken us 6 years to fix it! I guess we've been busy.

In closing though, I thought to share something really fascinating about the eggs which didn't hatch. They were all odd numbers: 3, 5, 9, 11 and 13.


Thursday, March 11, 2010

Chicken fever...again

Some have already arrived, but there are more in the incubator - baby chicks that is! The first batch brought seven babies, and the second batch I have yet to candle. But the chicks will be two weeks old this weekend!

So fluffy and cute...I especially like the barnevelder/welsummer crossed with araucana. For a cross, their feathers are a lot more marked than their barny/welsummer mums were, when they were chicks. I was surprised by that.


Out of this batch we got four crosses and three pure araucana. As you can see in the picture above, I'm sure we have two hens and two cockerels with the crosses. If you see the two hens facing each other, they have their shoulder feathers coming in, while the two other crosses (boys) have only their wing tip feathers. Girls have a habit of feathering up quicker than boys, but this is not the case with every breed. We'll have to see if my estimations are correct.


I think I may have only one hen out of the araucanas though. Albeit, sexing araucanas isn't something I've had much practice at yet. I think the boys have longer necks and bigger hairdo's than the girls. Again, I'll have to wait and see.

Of the other chicks I hatched prior to this batch, I wasn't able to keep them. I reached a point of overload when I began running out of places to put them all. I put it down to poor planning on my part, but I was fortunate to find potential new homes for them in groups.

You will be happy to note however, that I didn't have any problems with araucana chicks getting crooked neck, this time around. I deliberately kept the temperature on the incubator bellow the recommended 37.7 degrees Celsius. I was happy for it to range between 36.9 and 37.7, and got great results.

So it's true what I read, that it's less dangerous to go slightly lower than the recommended temperature, than to go even just a fraction of a degree higher. I reckon that's what was affecting my araucana chicks - it was too hot for them and it affected their development.

I'll have to see what the next batch brings at the end of the month. Not to worry about space though. I'm getting set-up before they arrive, so I won't have chicks coming out my ears again!!

Saturday, September 26, 2009

Peeps update

Well it's been over a week (more like two now) since our peeps hatched, so it's time for an update. Below is a picture of our mottley crew after a recent bedding change. Those babies can sure poop! They've doubled in size too.


We have some good news and some bad news to report. We lost a black bantam orpington chick, about 2 days after hatching. I'm not sure what they died of, but I found them laying very still one morning. I cupped them in my hand for about 10 minutes, and when I checked again, they had passed away completely.

It was a little upsetting at the time, but you have to expect some loses - it's only natural.

If you also look at the picture above, you'll notice two (very light grey) araucana chicks to the lower, right hand side. These two were part of the last 3 to hatch, and at the time I noticed they were a little noisier than the earlier arrivals. Especially one, which seemed to flop around the incubator as soon as it hatched.

I thought it was normal at the time. Turned out (24 hours later) both couldn't stand properly and needed their legs strapped together with a band-aide. This process is explained here.

Unfortunately, that wasn't all the bad news to be had. The noisiest chick which flopped around the incubator initially, had a bad case of crooked neck. This is him after having his legs taped together. You cannot really see his crooked neck, because if he sat on his bum and put his weight back, his head would stand up. Read more about the causes and treatment of crooked neck here.


I was deeply worried for him, and even contemplated culling as he was struggling against the more nimble siblings. He would get knocked over, couldn't stand and always ended up on his back, cheaping loudly. Poor baby.

After taping his legs, I monitored him for the next few days. He was getting some food and water, but always had to compete with the other chicks as his head kept wanting to flop between his legs. The material I'd read about crooked neck, seemed to suggest it would only get worse.

Dave offered to "do the deed" one morning while I was having a rest, before he had an appointment in town. Needless to say, I was very surprised when I got up an hour later and saw our little guy, still in the brooder. I was so happy Dave didn't go through with it. When he returned from his appointment, I asked what had stopped him - he said after he went in the room to get the chick, he quietly watched the little fella fight so hard to get at the food and water (with an obvious disability) he thought he deserved a few more days to see if there was any improvement.

And there has been!! Yay! His neck still isn't as nible as the other chicks, but he now has control of it. No more flopping between his legs or walking backwards. He gets around so much better - we should be able to remove his band-aide soon. The other chick is already band-aide free now, and gets around like Speedy Gonzallis.

Here is our crooked neck wonder chick today - now holding his head up high. He could not do this a week ago - his head would be laying on the ground.


What started out as a worrying struggle, turned out to be an incredible victory for our two little fighters. Would you believe I prayed that God would show me how I needed to approach life through this new struggle?

After the first chick died and it looked like we may have to kill another, it didn't feel like the victory I'd been planning. At the time, I was struggling with my own health too - my diabetes treatment wasn't working, the work outside was piling up and I felt extremely useless.

Despite all that went wrong however, the victory of those two little chicks over life, put the rest of my life into perspective. If you're given a chance - just ONE chance to live against the odds, then you have to fight for it. There are going to be days you want to let your head flop between your legs, and it feels like you're walking backwards - other's may push against you or stop you from reaching your goals too. But don't give up, because tomorrow you might get control back. Just a little bit, but it may just be enough to stand on your own two feet again.

We couldn't have hoped for a better introduction to hatching our own chicks. By the way, my health has improved remarkably too, along with the chicks; and we're all on the road to recovery together. :)

Monday, September 14, 2009

Incubator review & results

I was able to switch off the Hexabator today, for the first time in 3 weeks. So how did it perform in the end? I'm happy to report, of the 17 eggs left, after I candled them at day 10 - all 17 chicks have hatched successfully. And may I add, they all managed it by day 21 too.

The fact they all hatched on their due date, gives an indication I had the temperature set correctly. It's always an anxious time when using an incubator for the first time, because you need to test how it performs. Well, now I know to set the temperature around 37.7 degrees celcius according to the digital thermometer - and have the sensor (of the thermometer) at egg level.


And here are all 17 chicks, squeezing into a girls' size beanie. I put the beanie in, because I wasn't happy with the temperature inside the brooder. It should be around 35 degrees Celsius, but it was more like 30 degrees instead. When I noticed the chicks were all stumbling over each other, huddling for more warmth, I went looking for a stuffed toy. I couldn't find any that were the right size and wasn't my daughter's favourite, so then I saw the beanie she'd left laying on the ground.

Her messiness turned out to be a blessing as the little chicks love to sleep in it together. I'm going to look at buying a ceramic light-bulb in future too, as it seems the energy-saver isn't quite warm enough in the brooder. The old incandescent bulbs used to work a treat, but I blew my last one and you can't buy them any more. Se la vie, as they say, but there are other alternatives, thankfully.

As for the Hexabator incubator, I'm really happy with the choice I made. You could say it was a 100% success rate, of the eggs which managed to develop by day 10. I was expecting a few eggs not to be fertile, as my Gold Lace Wyandottes had only been breeding for a few weeks before I started collecting the eggs.

Well, now I'm off to find a good beanie knitting pattern, so I can make a few more!

Sunday, September 13, 2009

We have babies!


Eight babies arrived overnight. Four hatched by 5am this morning, but it doubled again by 7am.

Looks to be 3 araucanas (yellow) and 5 unknowns - could be bantam orpington or orpington x wyandotte. We still have babies hatching in the incubator. I hope they make it as I had to clear some of the babies out this morning, as they were knocking the unhatched eggs around a fair bit. They're now in the brooder (above). Of course, whenever I open the incubator, I lose humidity and that's essential to help the remaining chicks to hatch successfully.

So fingers crossed for the next batch which have pipped their shells, but not out of the woods yet!

Saturday, September 12, 2009

Shhh...


The brooder is now warming up...I've been hearing baby chicks all day...5 eggs have pipped.

That's 3 araucana eggs, 1 bantam orpington and 1 orpington x wyandotte.

No babies have emerged from their shells yet, but I'm expecting big things tomorrow!

Thursday, September 10, 2009

Day 18 - first attempt

Today is day 18, out of 21 expected for the incubation period. Poultry eggs can hatch anywhere between 19 and 24 days, and I've already noticed some of the eggs rocking. This is a sign that the chicks are moving and preparing to exit the shell. Of course, I'm not expecting anything for at least another 24 hours.

But day 18 is important for a few reasons. Firstly, it's the day you stop turning the eggs. Broody hens will often turn their eggs daily when sitting on a clutch, but when in an incubator, you have to do it for them manually. I have to do it by hand - usually once in the morning and once in the afternoon. This turning stops the chicks sticking to the membrane inside the egg. You want to give them the best chance of survival on hatching day, because it's quite an ordeal for a little peep.

The second reason day 18 is important, is you want to make sure your brooder is set up properly. The brooder is where they will live for the next month or so, after hatching. Without their feathers to regulate body temperatures, an artificial heat source is required to keep the chicks warm for about a month - until their feathers grow in.

I have a picture of my table lamp (with an extendable arm) placed directly over the brooder barrel. It has an energy-saver bulb, which doesn't generate as much heat as the old-fashioned light bulbs - but with the barrel shape of the brooder, it captures what heat is generated, perfectly.


This brooder is where I've raised all the chicks to date. It's only a half plastic barrel, normally used as an animal feeder for livestock, but I find it makes a very durable brooder too. When in use, the lamp will be extended lower, and if required, a sheet placed over the top. So what does the inside look like?


I've lined the base with an old cot sheet, and I have several rag towels in storage, intended for the same purpose. Chicks need to develop their ability to stand rather quickly, so it's best to provide a non-slip surface for them to practice on. Old towels provide something for their feet to grip on to, but they also make a great waste collector as well. I change the towels at least twice a day, soak them like nappies and then do a big wash when I have enough.

Some people use wood shavings in their brooders, but I find it gets into their food and water supply too easily. As the chicks grow older, I often pop in a sprinkling of wood shavings on top of the towels, to help absorb some of their messes.

The other important additions to the brooder is food and water containers. Never provide a water container that is deep enough for a chick to drown in. It doesn't even have to be deep water for a new hatchling to drown. Mine is a very small drinker, and only allows for a small beak to sip from. It's seen in the picture above. I've also used an old coffee lid as the feeder.

I provide chick crumbles for the first week and then try introducing lettuce and other organic edibles. A little bit of yoghurt doesn't hurt them either - just the plain stuff, about once a week. I often use a desert spoon and let the chicks eat it off the end. Once they get a taste for it, it's gobbled in a matter of seconds!

Well, fingers crossed for Sunday! All I have to do now is wait...

Sunday, September 6, 2009

First incubation attempt - update


Exterminate..Exterminate! The Darleks decree - these eggs are inferior and must be exterminated.

Seven were clear when I candled them at 10 days. Which now leaves seventeen viable eggs left in the incubator - out of the original twenty-four.

Unfortunately, not even the Doctor could save them in time.


Okay, if you're wondering about the figurines, Dave is an old Doctor Who fan. When our daughter caught sight of the Darlek and K9 figurines in the packet, she begged and pleaded with her father to let them out of the box!

Girls will be girls and boys will be boys - I have my incubator while they have their figurines.

Well folks, only seven days to go now!!!

For some awesome pictures of what to expect when candling eggs, visit here. These are not pictures of my eggs, but it's still a great example of what to look out for.

Thursday, August 27, 2009

Which one...incubators?

As anyone using the internet would know, hours can be wasted in the name of "research"! Google is my best friend in this regard, but it can also be a long-winded one. Page, after page, after page of results. I wish they had a new feature called, "these are the ones you really want!"

Alas, you just have to sift through the lot to find what you're after. So I thought I'd share some of the links I found during my internet research on incubators. There are quite a few different ones out there.

Being budget conscious, I didn't want to spend over $300 Australian, for an incubator to hatch my chicken eggs. Neither could I see myself needing to incubate over 100 eggs at a time. I wanted a few indulgent features; like the turbo fan for more even heat distribution and a thermostate to maintain an even temperature. I had to ponder if I really needed the automatic egg turning features though?

Well the first ones I came across were the styrofoam type incubators. They look like this:


This particular brand is known as a "Hovabator", but there is also an Australian made version known as a "Bellsouth". They have two clear windows on the top for viewing the contents, and the styrofoam is meant to insulate well. One of my main concerns however, was keeping the styrofoam clean, especially after chickens hatch.

Of course with the Hovabator, you can also purchase auto turning racks, which look like this:


These are really handy, as they'll turn the eggs regularly for you, without having to open the incubator. But unfortunately, a Hovabator or Bellsouth unit, with every feature I wanted (including the auto turning unit) would cost in excess of $300 Australian. That's not including postage and handling either. So it was on with my search!

I really liked the next incubator, as it had a bigger window to view and just looked easier to use:


This is the IM, 12 egg, manual turn incubator. This one cost bang-on $300, but I felt is was just a little too small for the asking price of a manual turn incubator. If I wanted the IM 24 egg, with everything included - it was around $560 Australian. Yep, it really is that expensive to buy a good incubator. Maybe if I was thinking about making money from hatching eggs, I could justify the expense - but I was really just "small fry" hobby hatching at this stage.

Not this small though! An "R-Com 3" (as the name suggests) only incubates 3 eggs at a time, but it's claimed to be fully automated. Set and forget!


While all these units had some of everything I wanted, I still hadn't found the one unit I could part with my money for. Then I stumbled across the Hexabator unit.


You would recognise this photo from one of my earlier posts - but this is the Hexabator set-up. It had the automated features I felt were essential, without the auto turning features. It was under $300 Australian, it was plastic for easy cleaning, turbo fan, thermostat and digital thermometer included as well - I didn't even have to buy the batteries! Including postage and handling, it cost around $230 Australian.

Of course, I have to see how it incubates with my first batch of eggs. Which actually brings me to a very important piece of information - the competence of the user. As good (or as bad) as the instruction manual may be, you really should join a poultry forum or have access to people who have used an incubator before. There is no substitute for experience- when you don't have any, find others who do. Expect the first few batches won't be the success you dream of, until you learn the tricks of the trade.

To help a little, I've included a link to a very good Poultry forum based in Australia. More importantly, it is to a discussion about the best incubators. It's a very fascinating read, and you'll find it here.

Also, here are some of the online incubators for sale in Australia:

Planet Poultry - where I purchased my Hexabator
WA Poultry Equipment - Australia wide sales, & pictures used from this site
Bellsouth Pty Ltd - Australia wide sales, & pictures used from this site
Brookfield Poultry Equipment - Queensland based but posts Australia wide.
Top Knot Poultry Supplies - Posts Australia wide.
Small-Farm Permaculture and Sustainable Living - best stats on the Hexabator unit
City Chickens - For South-East Queensland, option to rent units, also sales Aust wide

Have fun researching what incubator is best for your situation!

Sunday, August 23, 2009

New ways to hatch eggs

I received a wonderful surprise in the mail on Friday...okay, so I was totally expecting it...but it still felt very exciting when the mail-man finally arrived with my package!

After much research, I finally decided to purchase an incubator for hatching my chicken eggs. While the styrofoam type incubators on the market did seem more popular, I wasn't comfortable with the thought of egg goop, getting into the foam once the chickens hatched. So I came across a plastic type of incubator, that was very cost competitive.

Here is my Hexabator (pressing the link will take you to the website I purchased it from) :


As you can see, the major housing unit is made from plastic. Not only will make it easier to clean, but it will also make watching the hatch (in approximately 21 days time) easier too. Which by my calculations, should be around Monday 14 September.

What's that you say? Yes, I've set the eggs today! There are 2 dozen in at the moment, although it says the incubator can take up to 60 eggs.


I've got bantam lavender Araucana eggs, bantam Orpington eggs, as well as Gold-Lace Wyandotte X bantam Orpington. I was going to cross the Wyandottes with my Araucanas at first, but they seemed to get on better with the bantam Orpingtons in the end. Should be exciting to see what eventually hatches!

The temperature on the incubator is now set at 37.5 degrees Celsius, which is close to the optimal temperature for hatching eggs. For more information on what's involved in the incubation process, visit this link.

Wish me luck!