
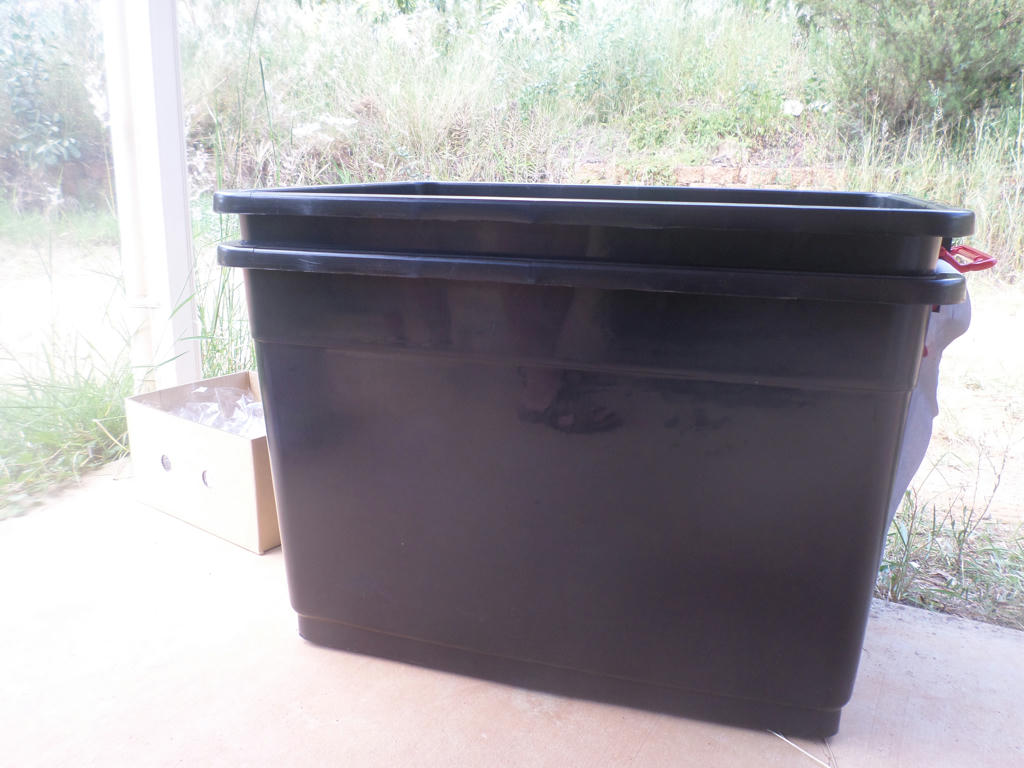
I mistakenly referred to them as 30 litre containers back then, when in fact, they are 160 litre containers. Which would basically take approximately, 6 x 25 litre bags of soil to fill each one. We purchased compost by the trailer load, to avoid all those plastic bags. Plus its more economical and a better product.
But I'm getting ahead of myself, because we had to make the wicking boxes first.

The perfect location for these containers, were next to our block retaining wall. They should get some nice radiant heat as winter approaches. We had enough room for three, but there's room for two more - so we continue to look for more discarded boxes.
David flattened the ground and set the tubs about 20cms apart. This was to ensure if we ever had to dismantle and move any in the future, we could access the sides, with our hands.
In the white tubs and green bucket above, were rocks collected around the property. We had a little blue metal (smaller rocks meant for back-filling walls) but to make them go further, we scrounged some rocks from elsewhere. We have a lot of petrified rock.

When we lined the bottom of the base with this petrified rock, we made sure they went down gently, so the base wouldn't crack. The flexible hose is just ordinary stuff (available at most hardware stores) sold as drainage hose to remove your laundry water, outside. We had owned this prior to moving here, so we didn't have to buy it. Frankly, I was relieved to see it being used for something other than a cupboard ornament.

It's attached to a smaller, tougher pipe, that was left over from our house build. It's plumbing pipe for houses, denoted by the green stripe down the length of the pipe. Grey-water pipe, is denoted with purple stripes instead, so its easily identifiable if they ever get uncovered or have to be dug up.
Neither pipe had any holes, so we had to make some in the flexible hose only. As that's how the water enters the base. We didn't require a drill for this part.

Our metal note-spike from inside, did the trick. We spaced them at roughly 10cm intervals, along the length of the pipe. Once the pipe was coiled on top of the petrified rock, we gently placed more rocks over the pipe - ensuring the straight section of pipe, stood up in the corner.

To help keep the straight pipe in place (it kept wanting to fall over) I temporarily propped it up with a large rock. It was removed once the pipe was covered with smaller rocks. Again, being careful when placing rocks in, so we didn't unnecessarily weaken the base.
This is actually the second wicking bed we set up, because we were too busy setting up the first one, to stop and take pictures.

Once the rocks were filled to approximately 10cms in depth (total), we put down some shade-cloth we had tucked away in the laundry. It had to be cut with about a 10cm overlap, to help keep the soil out of the water reservoir.
Once we filled the tub with about 30cms of compost, it was time to pop the water hose in the pipe, to see if it worked. We filled the reservoirs in both containers, with one of our chicken coop tanks (as we call them) as they're located at Hilltop chicken coop. The vegetable patch, is just down hill, so the water is gravity fed.

After about 5 minutes filling, we had success! Water came out of the overflow hole we drilled. Actually this hole wasn't drilled at first. I used our note-spike, first, as a guide - where I intended to come back later, with the drill. But the note-spike wasn't easy to make a hole with, and I didn't notice, until I looked on the other side, the plastic showed signs of stress.
So I placed some gaff tape over the hole, before drilling, for added support. So take note, only use a drill for making holes in your tubs. And start with a small drill bit, then incrementally work your way up to the larger. Don't force or otherwise push the plastic to get the hole made. As water retention is integral in the wicking box design.

I used some recycled, plastic milk-bottle tops, as a cover for the pipe, so things cannot fall in, and to prevent mosquitoes a place to breed. I noticed on the first windy day however, the caps blew off. So I've improvised by using a glass bead on top, to weigh it down. They haven't come off since.
Do you remember when glass beads in the garden, or in a vase, were all the rage? I bought these when I was a young 20 something, and can't think for the life of me, why I would specifically buy them! They hung around in a vase, becoming a dust magnet for ages, when I eventually moved them outside, to mulch my pot plants, My toddler recently discovered them to play with (he calls them eggs) and now a few of the larger ones, weigh down plastic bottle caps.
I would never buy these things today, but they haven't been entirely useless in their lifetime either.

Of course, in went our seedlings (and some seeds) at the earliest opportunity. We have planted a variety of brassicas, some rubarb, buckwheat, pot marigold, nasturtiums, lettuce and peas. I'll have to see how they go over winter. I will put a mulch layer down, once all the seeds we've planted, have germinated.
There is only one wicking box left to set up, and there's a reason it hasn't been done yet.

It has a crack in the base, probably due to the fact, we placed some heavy stuff in there for storage at one point. Or it could have always been there, and we missed it. Anyway, we have to come up with a way to seal it, cover it or do both.
If you want more detailed information about wicking boxes (and beds) what they are, and how to set them up. I would recommend this link. That's where I first heard of them and learned the theory behind them. Of course, reading Bev's blog at foodnstuff, and how she uses them to grow food, always kept the mental wheels turning, about how we could set them up too.
What I like about wicking boxes is how water efficient they are. Which is a strategy we need to employ more and more, in our increasingly water challenged environment. What really excites me about the potential of wicking boxes (and beds) though, is how they can be made with things which would otherwise go into landfill.
The only money we actually spent on this project, was for compost, and a few punnets of seedlings - marked down for quick sale. The rest of our materials were either pre-owned (shade-cloth, flexible hose, pipe and glass beads) or they were recycled (plastic tubs, and bottle caps) some were even scavenged, in the case of rocks. What it took the most of, was time to collect everything we needed. Hopefully we'll get a lot out of these boxes, in the years to come.
Is there something you've been meaning to try in the garden, and haven't managed to orchestrate yet?
Wanted to make a lot of comments about this but will do a blogpost myself and refer back to your post. It's just that we each do our wicking boxes in very different ways and I'm interested in how each way functions and how successful it is.
ReplyDeleteI think your approach is a sensible one, and I hope my hose doesn't get plugged up with debris or the water putrid. I've heard they can become issues. I'll see how ours perform. I have to get some worms into them, and shade up before summer.
DeleteI look forward to reading a blog post, about your experience with the system you work with.
Thanks for this tutorial. I think you showed it really well. I might consider them for myself if we ever get our garden going. Having not to dig in the soil this year is a real energy and time saver yet we need to plant at least some food besides our commercial garlic and tomato.
ReplyDeleteContainer planting is great if you don't think you'll be staying where you are, or its a physical limitation preventing you getting down to ground level. Herbs do very well in containers I've found. A self watering container, just makes the burden of watering, that bit easier too.
Delete