
This is what my original a-frame chicken tractor, looked like when I first made it in 2008...
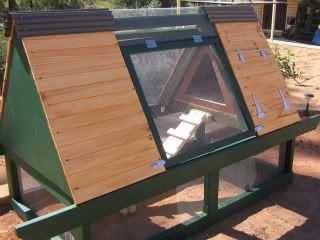
2008
Ah, shiny! Then, this is what it looked like in 2010 (just two years old) after a tree fell on it...
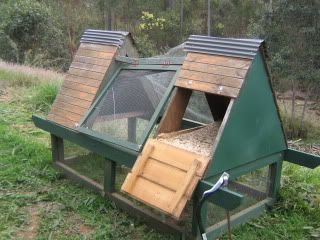
2010
I completely removed the top and kept the rectangular base in storage. While only the middle was damaged by the tree, I wasn't entirely happy with the design, and decided to start again from scratch Here is the reconstruction of the a-frame, onto the base, only some six years later....

Two days work
I had to remove the old carry handles (new ones are pink) because they sustained some water damage. Given it's 8 years old however, the base is still holding up pretty good!

Old handles were too water damaged to keep
It's still a work in progress, using some unusual materials along the way.
The wood for the a-frames, are new, hardwood tomato stakes. It helps to keep it lightweight. It was too heavy in it's previous incarnation.

The apex from an old bed
The beam down the middle, is from Sarah's old double bed, which broke. We're looking to slowly reuse the parts from the bed, as we find a need. Given this beam is aluminium though, it will help to keep the weight down too, without compromising strength. It was exactly the right height for the base!
I make it look easy, but I spent many hours walking between my various supplies, searching for parts to formulate a plan. Everything is patch-worked together as I find the right pieces. This is how I build, to cut costs by recycling where possible.

Where's the rest of the triangle?
The hardest challenge, was finding a way to secure the middle a-frame, without the central bar. What a nightmare! I still don't quite know how I managed it. Thank goodness for spare bits of scrap wood, determination and half a days work.

Green wood attached to aframe, but only sitting on the base
I had to rig up a temporary support (green wood) to set the frame on the base. Just so I could figure out the rest of the pieces of wood, to secure it. The raw horizontal piece, isn't attached yet. I'm not a natural mathematician. In fact, calculating geometry is like Chinese nail torture to me. But I generally find my solutions, another way. By rigging up visuals, I just draw lines, cut and screw in place.
It works.
I've done more, but this is all I have time to report on for now.
You are doing a good job, Chris. I wouldn't know where to start. Can't wait to see the finished chicken tractor.
ReplyDeleteSometimes I don't know where to start either! ;) Then desperation kicks in.
DeleteGood job there! Especially since you did that AND completed some drawings as well. Getting much more done than I am (sigh!)
ReplyDeleteI'm fortunate to have a few helpers, occasionally. I'm sure what you are doing, is precisely what you can manage. Which is no doubt, quite a lot. :)
DeleteI am always amazed at your wood working skills! I also think its great that you can continue with chickens. I miss them on occasion-like when I run out of eggs, but its actually cheaper for us to go buy a dozen of eggs from the Amish than it is to raise our own right now.
ReplyDeleteThanks Linda. :) You're fortunate to have a good agricultural community, which you can buy direct from. Better to support a farmer than a supermarket.
Delete