Thursday, July 4, 2019

Compost gully

June 2008 - first bin


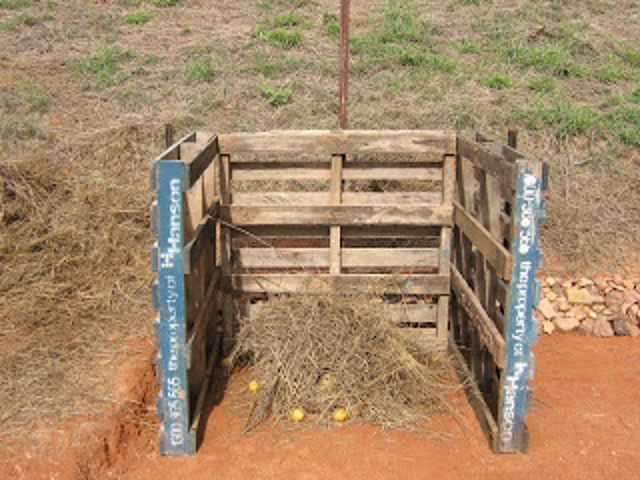
When we started composting on our land, we thought a large standing compost bin, was the way to go. The kind with multiple bays. We built three, out of recycled pallets. It was appealing, because we had the opportunity to make a large batch of compost, in one go. Unfortunately, we weren't generating enough of all the different ingredients to make a substantial batch.

Wednesday, July 3, 2019

Aerial view

2007 - initial front terraces, as the house was under construction


We've been living on our 5 acres of bushland, for twelve years now. Easter, was the anniversary of moving in. Our leap into large-scale gardening, happened to coincide with the cultural celebration, for new life and new beginnings. Easter. Since this cultural celebration, just passed - it was fitting to share an areal view, of what all that Natural Sequence Farming, Permaculture and Natural Succession Gardening, has achieved during that time.

Tuesday, July 2, 2019

Switcheroo

Hi folks. I've not been blogging, due to some big decisions, which have unexpectedly emerged in our lives. One has to do with my new website. After several months waiting on Weebly, to fix a bug in my comments box, I've still had no success. No follow-up contact, either. Now they aren't returning my inquiry emails. So I've decided to stop blogging about our property, there.

I could have changed hosting companies, like I was intending to, later. However, another big decision was going to affect that too.


~ Late May ~
time for fledgling kookaburras, to leave the nest


For now though, please bear with me, as I gradually migrate the four property related posts, back here. Where I also intend to finish the second part, of the last post - about Resilient surprises. That was left hanging for a while.

I'll try to post one-a-day, so I can be all caught up, for the next bit of news to share.

It's been crazy around here lately, with more crazy to come. So if I don't sound like my normal self, it's because I'm not really dealing with normal, at the moment, lol.

I hope you're all doing well.


Sunday, June 16, 2019

Leaking money

I'm back from La-la land, where people go to be sick. Over a month, taking care of kids and then nursing myself back to health, I'm finally regaining my senses enough to tackle some challenges, head-on. Like how NOT to spend money, where I don't have to.

In the kitchen, I've had an ongoing problem for over 3 months now. Which I've been trying to find an economical solution to...


Something broke!


How much would you expect to pay, to fix a leaking dishwasher drainage hose? In our case, it was going to cost around $300. Gasp, right? It comes down to one company in the region, who only fixes Smeg dishwashers. They have a business to run and need to be profitable, but I won't spend $300 to fix a hose, without exploring alternatives first

Having already spent $120 for them to investigate, and determine the problem, it was educational watching how to dismantle parts of the machine. However, instead of paying them another $180 to finish the job, I was going to find the part myself, and see if I could install it. After all, how hard could it be to replace a piece of plastic?


A requested, ginger-kisses cake


In the interim though, there were two birthday parties to organise, and a bunch of other important stuff, I won't mention to save time. Needless to say, 3 months can pass very quickly. But in all honesty, I was really dragging my tail (intentionally) when I had gaps of spare time available.

In those 3 months, I may have located the part online, organised shipping, watched countless instructional videos, and nursed us all back to some semblance of cognitive health - but I still wouldn't tackle the dishwasher. I was stalling. Everything was ready. Why did I hesitate?


Some business to attend to


FEAR! The machine may have only been 5 months out of warranty, and just over 2 years old, but I still had a dishwasher valued near $2,000. I'll tell you why we even considered paying that much in a different post. Needless to say, I felt like a rookie in the big leagues now, and understandably anxious to make the first move!

The instructional videos I was able to watch, were only for generic brands. So not exactly confidence boosting. What I gleaned from the technician we paid to determine the problem, only showed me how to separate plastic joints, without breaking them. That gave a little more confidence, but I still had no idea what I was going to be facing, underneath. Especially since the part I was replacing, looked slightly different to the ones in the video.

Unfortunately, I couldn't avoid the stainless steel elephant in the room, any longer. Seriously. Christmas was coming! So I dragged out the tools and parts (above) which the instructional video, recommended, and put my head down to work.


The test run


Ironically, the multi-grip and hose clamps, turned out to be of no use, at all. Just a simple screwdriver was needed. Plus a lot of patience. As what I was planning for taking the machine apart, turned into dismantling, underneath the sink too. Thankfully, not the plumbing. Just everything I stored around it, blocking access to the hose clamp.

I'll spare you the details of my rookie, learning curve - but it was laughably easy to replace, in the end. Every step was less complicated, than the instructional video outlined. So I guess, Smeg still designs its machines for simplicity. It was tempting afterwards, to reprimand myself for letting fear control the schedule, almost every step of the way. But I realised there was some logic to it, as well...


Sweet victory


Those three months, gave time to watch a lot of instructional videos, get the best price for parts online, and accomplish a bunch of other stuff in my life, that really needed doing too. In the end, it forced me to be patient. And by association, I gained more confidence. What looked like "fear" calling the shots, was really building momentum into providing the solution. Rookies, just need more time to practice the moves.

Now my Smeg is back in it's little nook. Leak free. Saving just over $150, in those 3 months. Should the part ever fail again, I can confidently replace it myself. So there's potential to save even more money, in the future. It makes sense to spend $300 to replace a part, if you have mobility issues, or a bunch of kids to wrangle. Being realistic, is part of the problem solving process. But if it's doable, look for ways to empower your skill-set and save yourself some money.

Safety first though. Always unplug an electronic device, if you're going to work on it. Especially if it's in contact with water. And bring lots of towels!! Have you had to push yourself past a discomfort zone, recently (or ongoing) as the case may be? Do you still feel like a bit of a rookie?


Sunday, May 26, 2019

Do nothing

It's almost winter projects time, and I'm doing nothing, Well, for good reason. I promise. If you want to read more about why, check out the new blog post on my property website.


Does nature knock at your door, too?


I expect we're going to be busy this autumn/winter, catching up on some overdue projects. Summer. Heat. Drought. Need I say more, as to why we're behind? Fingers crossed, the budget will cooperate, along with our expectations. I'd really like to get a few things achieved on our list, for my birthday (come July).

But you know how it goes - expect the unexpected, lol.

Are you planning anything special, this winter? Or summer, for the northern hemisphere?


Tuesday, May 21, 2019

All things compost


Over at the Gully Grove website, I've written about all our composting attempts to date. It was interesting for me to revisit where it all began, to where we ended up! If you want to read the new update, visit Compost Gully.

Just a quick update, on the comment box on my website too - Weebly has determined it's a bug, and is endeavouring to fix the "notify of reply" check-box. You can still comment, with no problems. But the tick won't appear, if you click the option to be notified of follow-up comments.

Passionfruit slice

My kitchen has been getting a workout recently. The things I've had to bake in the last week, are a birthday cake, and some bake wares for my son's school. The latter was to raise funds on voting day (last Saturday) as they ran a baking stall, and sausage sizzle at the school - where people vote.

I made caramel popcorn. Yum! But do you think I remembered to take a photo? Good news is, the stall was a resounding success. So all those kitchens around the community, baked up a storm!

But this post is about, Passionfruit slice. I have a gluten free version (which I personally think tastes better) but will share the regular flour recipe, in the "variations", down the very bottom.


These two ingredients are staples in my pantry ~
but you can use fresh passionfruit, if it's in season for you


PASSIONFRUIT SLICE


Preheat oven 170 C (fan-forced) or 180 standard oven
Grease and line a slice pan


 Ingredients pressed in pan, ready to bake

STEP 1 (BASE):


Combine 1/2 cup plain, Gluten free flour *
                1/4 cup almond meal *
                1/4 cup buckwheat flour *
                1 cup desiccated coconut
                1/2 cup white sugar
                1/2 teaspoon bicarbonate soda
                125g melted butter
                1 tea vanilla


  • Mix together in bowl, until well combined - then press into slice pan.
  • Bake 15 minutes, or just golden brown. Don't over bake. Cool slightly.


A little overdone - aim for "just" gold brown


Reduce oven temperature to 120 C (fan-forced) 130 standard oven


STEP 2 (TOPPING):

              
Combine 1x 395g can of condensed milk
                1x 170g can of passionfruit pulp *
                juice of one lemon


  • Mix together in bowl, until well combined - then pour and spread over base.
  • Bake 10 minutes, or until set. 
  • Cool, then slice into individual portions. Store in fridge, in a sealed container.


Glossy after baking


(*) VARIATIONS:


For all those questions you may want to ask, about ingredient substitutions

  • Substitute the 1/2 cup Gluten free flour, for regular flour, OR,
  • Substitute the first 3 dry ingredients (base) with 1 cup regular flour, OR,
  • Substitute the first 3 dry ingredients (base) with 1 cup Gluten Free flour
  • Substitute canned passionfruit pulp with 2x fresh passionfruit (just the pulp)
  • Add zest, as well as juice of the lemon, if you like tart. Otherwise just the juice 
  • A slightly larger can of condensed milk (up to 410g) is fine


Enjoy!


While I personally love tart flavours, and will enthusiastically add both the zest and juice, to most recipes - it tends to overpower the flavour of passionfruit, in this one. So it's one of those extremely rare recipes, I will opt for the zest OR the juice. The latter, is more palatable for children.  

Once finished, the base should be chewy, and the topping like a soft gelatin, which will keep it's form, once cut.

If you're wondering why I add the buckwheat flour and almond meal - it adds depth of flavour (and a few more nutrients) to what is otherwise, just white flour and coconut for the base. This is unashamedly, an indulgent, sweet treat. But any way I can slip in a few more nutrients, and improve the flavour, I will.

After sitting down and writing about this slice, I think I can hear it calling from from fridge! Most likely, it's just my stomach talking, lol. I missed lunch.